| The subject of this article is from the ExoMech update.
The information from this article is up-to-date as of 10 June, 2020. |
The information from this article is is up-to-date as of 10 June, 2020.

Creating Employee Submission of Discoveries to CELAB Galactic Industries is a supplementary detail page.
Communicating Discoveries to HQ[ | ]
All employees are required to document discoveries on this NMS Gamepedia website, the employee should record all system discoveries to CELAB Galactic Industries using the provided Google sheet database.
Documenting Star System Discoveries on Wiki[ | ]
The following information should be provided at minimum for the wikipedia pages:
The employee must provide ALL required screenshots for a star system to be documented in quality fashion as follows:
| Screenshot Reqd | Topic/Type of screen | Example/Sample filename | Instructions |
|---|---|---|---|
| Optional | Original system name navigation screen |  AGT Cel-Daitos-Tak-sys-nav-orgname.jpg |
Strongly encouraged. Screenshot of the System Map screen before it is renamed. Ensure to press R to expand system details first. |
| Mandatory | Renamed system name navigation screen |  AGT Cel-Daitos-Tak-sys-nav.jpg |
Must press 'R' to expand details on the system map screen to show economy and conflict conditions. |
| Optional | Original system name info panel |  AGT Cel-Daitos-Tak-sys-info-orgname.jpg |
Should show system original name and planet details. |
| Optional | Renamed system name info panel |  AGT Cel-Daitos-Tak-sys-info.jpg |
Should show system renamed name and planet details. |
| Mandatory | System coordinates via a signal booster |  AGT Cel-Daitos-Tak-sys-coords.jpg |
Land on a planet in the system, place signal booster on ground, press H to make sure planet name is on screen, screenshot. This is absolutely mandatory for every system. |
| Mandatory | name of the explorer steam userid that discovered the system and date of discovey | n/a | Provide Text |
| Mandatory | Era of screenshots (eg Beyond, Synthesis, Living Ship | n/a | Provide Text. Screenshot not required but era mandatory |
| Mandatory | One info page screenshot per planet (using renamed/uploaded name) | 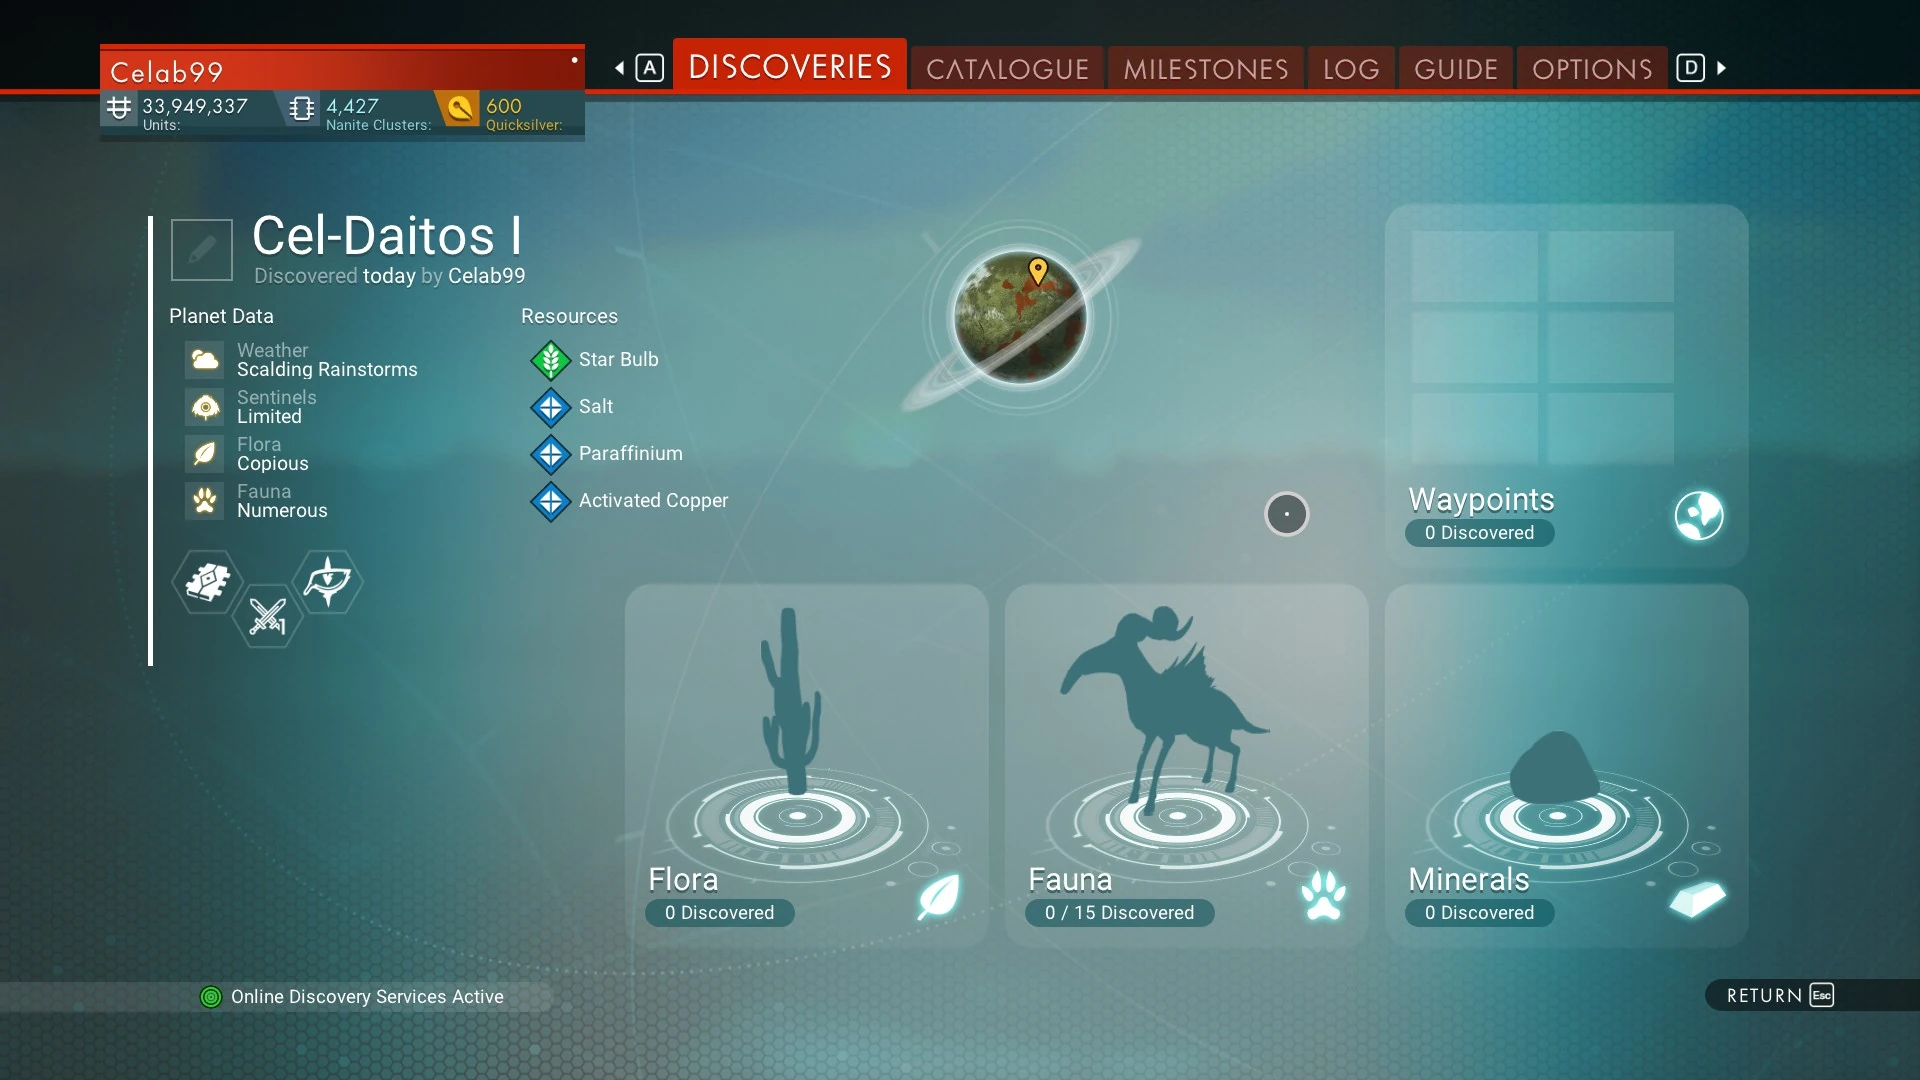 Cel-Daitos I-05.jpg |
Date of discovery is optional. |
| Optional | Galactic Trade Terminal (GTT) at space station | 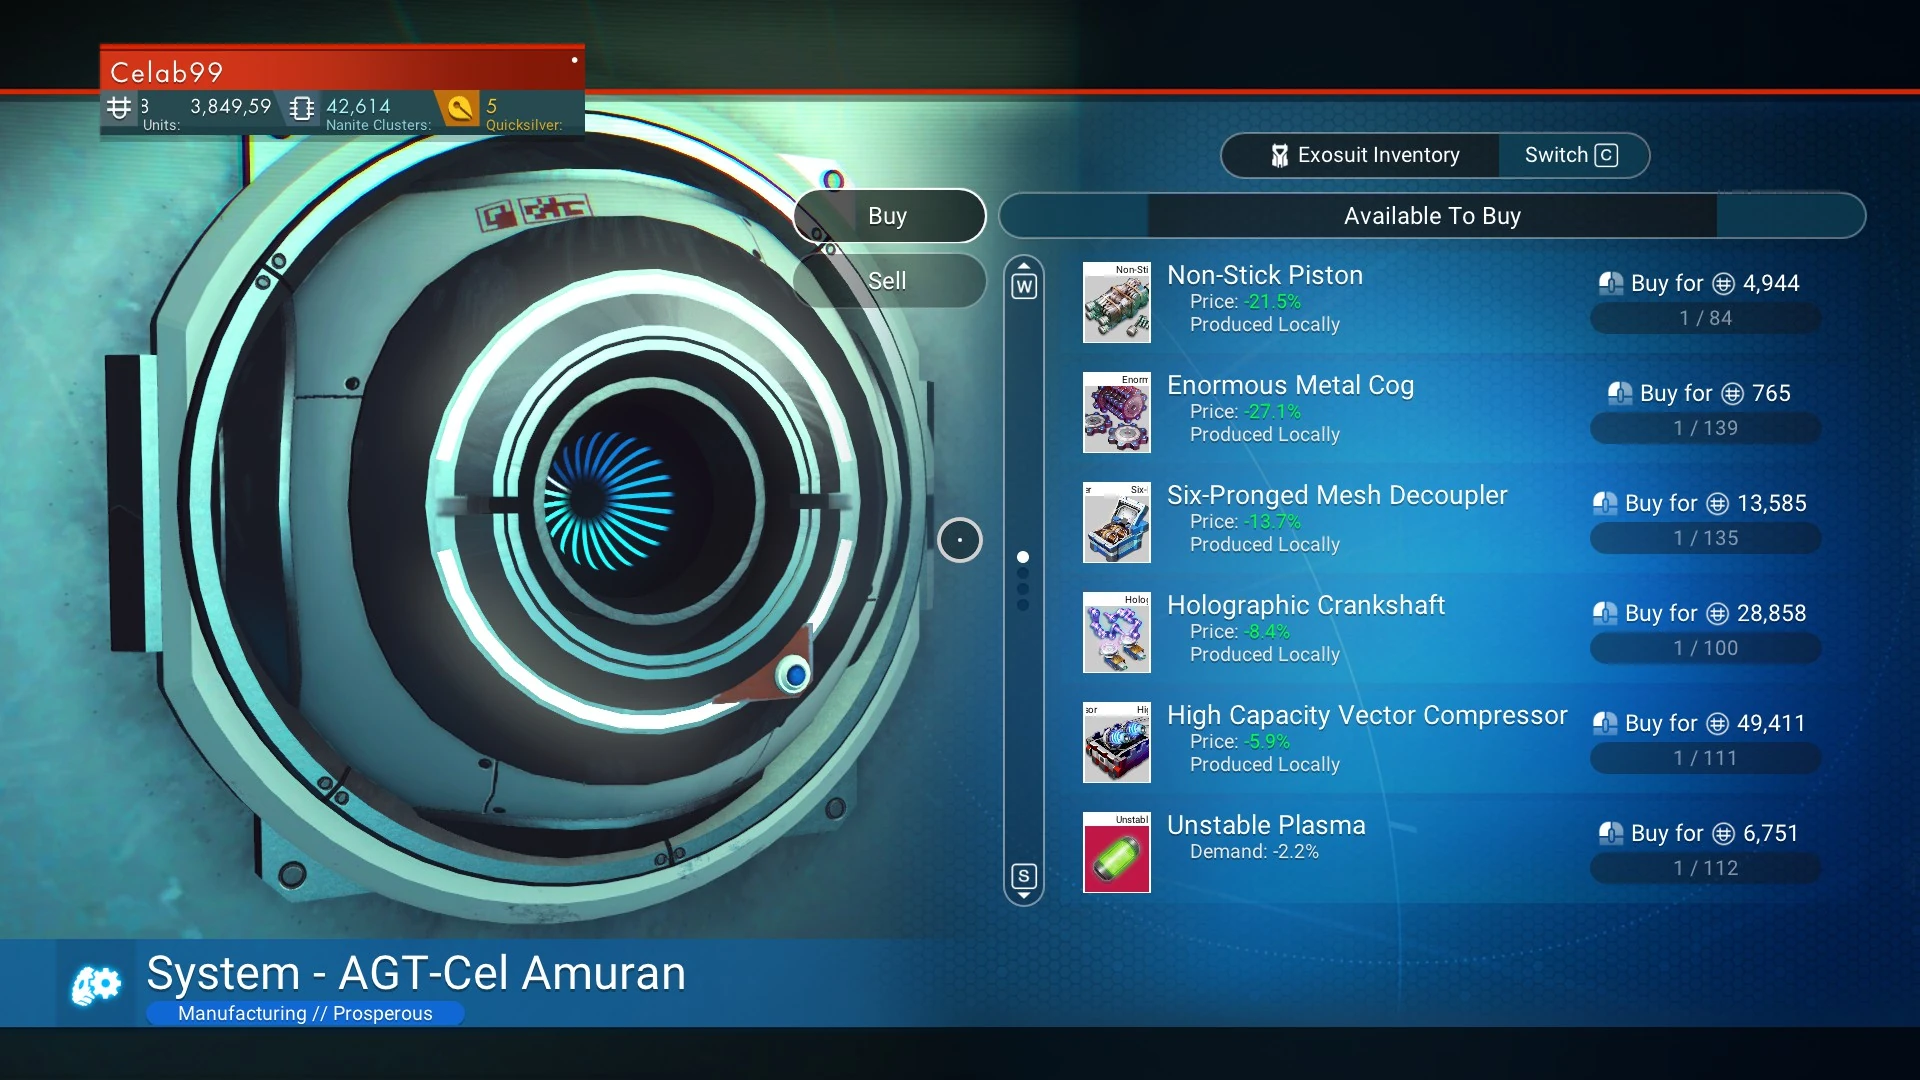 AGT Cel-Amuran-sys-GTT.jpg |
Make sure to screenshot when it shows the WHITE boxed trade commodities that appear first on all GTT. Only screenshot the GTT at the space station. |
| Optional | Multi-tool at space station |  AGT Cel-Amuran-sys-SS-MT01.jpg |
Screenshot an image of comparing the Multi-tool at space station to your own multi-tool |
Documenting Planet Discoveries on Wiki[ | ]
For each planet in the star system:
| Screenshot Reqd | Topic/Type of screen | Example/Sample File name | Instructions |
|---|---|---|---|
| Mandatory | Original planet information screen |  Cel-Daitos III Minor-04.jpg |
Screenshot before renaming |
| Mandatory | Renamed planet information screen |  Cel-Daitos III Minor-05.jpg |
Screenshot after renaming |
| Highly Recommended | Image of planet from space, no text |  Cel-Daitos III Minor-01.jpg |
Enter Photo mode, navigate location to clear starship from image, take screenshot |
| Highly Recommended | Image of planet from space with text |  Cel-Daitos III Minor-02.jpg |
Switch to external view of spaceship, with planet in front of it with text showing and take screenshot |
| Highly Recommended | System coordinates via a signal booster | Cel-Daitos III-coords.jpg |
Land on a planet in the system, place signal booster on ground, press H to make sure planet name is on screen, screenshot. This is recommended for every planet to minimize errors. |
| Recommended | First arrival |  Cel-Daitos II Minor-06.jpg |
Screenshot after land on planet and exiting ship first time |
| Mandatory | Era of screenshots (eg Beyond, Synthesis, Living Ship | n/a | Provide Text. Screenshot not required but era mandatory |
| Recommended | Surface scan |  Cel-Daitos II Minor-07.jpg |
Enter scan mode, aim above horizon so nothing is being scanned and take screenshot |
| Recommended | Day Weather conditions |  Cel-Daitos II Minor-08.jpg |
During daytime, press H to make sure planet name is on screen, screenshot. Prefer screenshot using planets' Renamed name. |
| Recommended | Day Storm Weather conditions | Cel-Daitos II Minor-09.jpg | During daytime storm, press H to make sure planet name is on screen, screenshot. Prefer screenshot using planets' Renamed name. |
| Recommended | Night Weather conditions |  Cel-Daitos II Minor-10.jpg |
During night time, press H to make sure planet name is on screen, screenshot. Prefer screenshot using planets' Renamed name. |
| Recommended | Night storm Weather conditions |  Cel-Daitos II Minor-11.jpg |
During night time storm, press H to make sure planet name is on screen, screenshot. Prefer screenshot using planets' Renamed name. |
| Recommended | Portal coordinates | 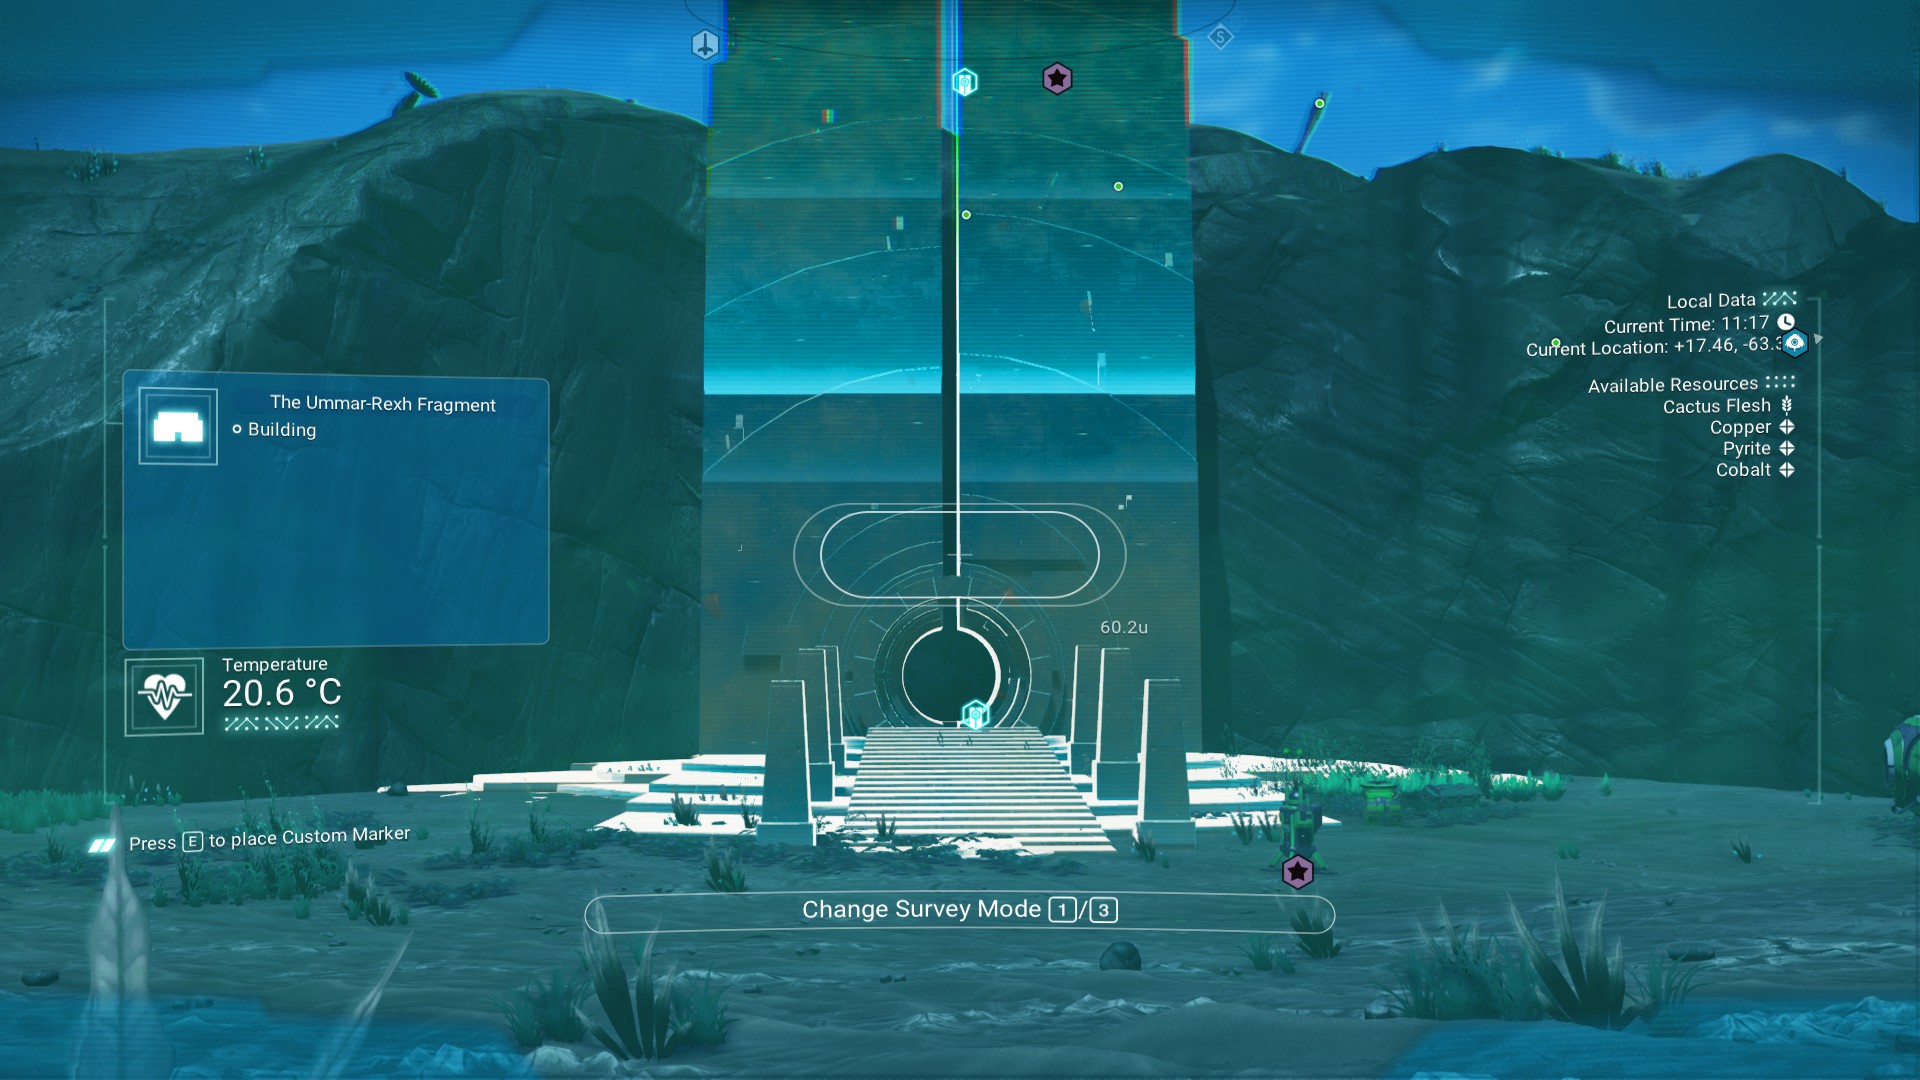 Cel-Daitos II-loc-01b.jpg |
If you find a portal on a planet, Enter into scan mode and take screenshot when the x/y (latitude and longitude) in the upper right corner of screen are clear, unblurred and readable |
Submission Process[ | ]
Google Sheet Completion[ | ]
ALL employees must fill out the entry spreadsheet on Google Sheets. The sheet can be provided by contacting the CEO who will arrange sharing of the Google Sheet database. Employees that enter information into the Google sheet database can automate over 90% of the process of entering data on a Wiki page.
CELAB Galactic Industries will provide the consolidated master sheet of star system explorations and discoveries for all employees on a quarterly basis (End Apr, July, Oct, Jan) in Google Sheet Form.
Wiki Manual Self Submission[ | ]
The employee is strongly encouraged to document their systems themselves on the wikipedia site with the info from the above sections.
The following Text Files can be used as templates for entering information on the Wikipedia:
- Base Page
- Creature Page
- Multi-Tool Page
- Planet Page
- Moon Page
- Region Page
- Ship Page
- Star System Page
Note that the above files will be updated occasionally so Check back Often.
Current Version of Files is updated as of 14-May-2020.
Using The Google Sheet Database Tool[ | ]
The tool is composed of the following tabs relevant to employees:
- Region DB - If you are entering data, you MUST make sure the region for your data exist first, If not you must enter a new region in the rows. If you do not do this, you cannot proceed to enter in other tabs.
- System DB - Database for starsystems. A row MUST be completed for each starsystem BEFORE trying to enter data for fauna, multi-tools, starships or planets in that star system
- Planet DB - Database for planets. One row per planet in each starsystem
- Fauna DB - Database for fauna. One row per fauna on a planet
- Starship DB - Database for starships. One row per starship
- Multi-Tool DB - Database for Multi-tools. One row per multi-tool
- Auto-Region - Tool for generation Region Wiki page
- Auto-System - Tool for generating Star System Wiki page
- Auto-Planet - Tool for generating Planet Wiki page
- Auto-Fauna- Tool for generating Fauna Wiki page
- Auto-MT - Tool for generating multi-tool Wiki page
- Auto-Ship - Tool for generating starship Wiki page
Order of Entry of Data[ | ]
Note that if you want to use the database to generate pages for the wiki, it is MANDATORY to enter data in this order in the DB tools. In general for ALL Database tabs, GREY CELLS should NEVER be edited. Please only enter data into white cells. Wiki pages will depend on data to be entered else the wiki pages generated will be incomplete:
1. Enter Region info into Region DB
- Region Name - Enter the region name
- Select a galaxy - Pull down or partially type to select a galaxy
- Civilized - Pick the civilization that claims this region (eg. Alliance of Galactic Travellers). Note few regions should be claimed on the region page unless a major presence exists
- Coordinates - Enter Galactic coordinates in AAAA:BBBB:CCCC:XXXX as per signal booster format. The last four characacter should be not used and changed into XXXX for the region page.
- Quadrant will be automatically generated if galactic coordinates entered per the advice above
- All other cells should not be modified
2. Enter new system into system row in the system DB
- Galaxy - will be automatically populated when you select a region
- Region - Pull down from cell or partially type the region name
- System Name (Unique entry) Enter a unique system name that does not already exist the DB. If a same name exists and you are entering a different system with the different galactic coordinates, then using a modified name. Standard wiki practice is to add a unique identifier in brackets after the name.
- PC System Name/PS4 System Name/Xbox System Name: Enter the actual system name as saved on NMS discovery database as per your platform (PC, PS4, Xbox). If you know names used for that same system on other plaforms please provide it
- Original Sys Name: If you recorded the original procedural generated name, enter it. Highly recommended.
- Galactic Coords/Glyphs: Enter Galactic coordinates in XXXX:XXXX:XXXX:XXXX as per signal booster format. Portal glyph codes will be automatically generated
- Planet of Interest - skip for now until you enter planets/moons for this system later
- Source - Free form text for describing the source discovering this system. Mostly, if discovered by yourself put your gamertag/name/reddit handle etc. Sometimes we learn of a system through: weekend missions? reddit/twitter/other link? multiplayer session? You can note anything of use to other travellers in this cell
- Discovered by - Enter the gamertag the system is recorded as Discovered By on the NMS Online discovery database
- DiscoveredLink - Userid on the Wikipedia of discoverer if you have one. Note at present most of you should skip this and just use 'N/A'
- AGT Starfleet Division - This is an idea for future use, each player will get a different starfleet code. For me, its how I track which SAVE file I used to discover something. I will need to manually assign starfleet codes for present until we have a better process. For getting started you can skip this entry
- Discovery Date - Date that it is marked as discovered in the NMS online discovery service. You can see this info a space station by scanning the floor of the systems space station.
- Survey Date - The date you collected the data in the game (may not be the data you discovered something!)
- Special Interest - do NOT try to enter data here, its automatically populated if a Black Hole or Atlas Interface exists for this system
- Personal notes - Anything you type here will be added into the wiki verbatim in the additional notes section of the system wiki page
- Civilized - Pick the civilization that claims this star system (eg. Alliance of Galactic Travellers)
- CG Bases - Select YES if AGT bases exist in the system
- Bases - Select appropriate estimate of number of bases in the system
- Platform - Select PC, PS4 or Xbox
- Mode - Select mode
- Category - Enter the category of the star system, displayed when you look at the star system in the galactic map
- Color - Enter the color of the star based on the category. For guidance, refer to Spectral class
- # of planets - enter the number of planets
- # of moons - enter the number of moons
- Faction - Select the faction, make sure to consider if the system is abandoned by a faction and select accordingly
- LY from center - An estimate of this is calculated automatically. It may vary by 1% from the in game display.
- Water Y/N - Select Yes or No if the Galactic Map says water exists in the system
- Economy, Wealth, E-Buy, E-Sell, Conflict - Enter as per the galactic map displays for this system
- Release - Choose the game release of this data entry info
- Space Station Multi-tool - Skip on first creation of this the system row. Come back to choose once you create the multi-tool in the Mutli-Tool DB later.
- 5 cells of Space Station Trade item exist to pull down select trade items that are available for sale here
- Pull down cells of Exosuit S Class upgrade modules x 4, Exocraft S Class upgrade modules x3, SpaceShip S-Class Upgrade Modules x 4, Multi-Tool S-Class Upgrade Modules x 4 exist to select S-class module available at the Space station tech merchants
- No other cells in this row should be edited
3. Enter data into Planet DB for EACH planet and moon in the system
- Galaxy and Region will be populated when you enter/select the star system
- Planet Name (Unique entry) - Enter a unique name that does not appear in this column,if a similar name exist then enter a clarification in () after the name to make it unique [eg. AGT Embassy (PS4)].
- Planet Name (PC) - Enter it exactly as it stored in NMS online discovery database on the NMS PC universe (if known)
- Planet Name (PS4) - Enter it exactly as it stored in NMS online discovery database on the NMS PS4 universe (if known)
- Planet Name (XBox) - Enter it exactly as it stored in NMS online discovery database on the NMS Xbox universe (if known)
- Original Planet Name (Before renaming) - Enter the procedural name of the planet originally provided by NMS before it is renamed (if known, but very useful to record)
- Planet-moon match - If this is a planet enter the number of moons. If this is a moon, enter the planet name it orbits
- Planet/Moon - Select if this is a planet or moon
- Biome Type - Select the biome type
- Description of Planet - 9 following cells where you pick the cell that is WHITE. The cells will be GREY or WHITE depending upon the BIOME Type chosen earlier. In the white cell, select from pull down list the description of the planet. If you did not record the info choose UNKNOWN
- Terrain - Pick one of Pangean (waterless), Archipelago, or Continental land masses. If you did not explore sufficiently choose UNKNOWN
- Type of land - Subjectively make a CHOICE based on your observed land patterns (rocky, hilly, flat, etc). If you did not explore sufficiently choose UNKNOWN
- Weather of planet - 9 following cells where you pick the cell that is WHITE. The cells will be GREY or WHITE depending upon the BIOME Type chosen earlier. In the white cell, select from pull down list the weather of the planet. If you did not record the info choose UNKNOWN
- Extreme Weather (Non Mega Exotic only) - If EXTREME weather is determined based on info entered, it will be automatically flagged here. Do not enter it
- Extreme Weather for Mega-Exotic Manual Entry - If this planet is Mega Exotic this cell will be WHITE and you have to choose Normal or Extreme weather manually. For all other biomes this cell will be GREY and you do not enter data,
- Resource 1/2/3/4 - 4 cells for resources. Pick resources like copper, fungal mould, etc. that are listed on the planet info page
- Special A' - If planet has Ancient Bones or Salvagable Scrap pull it down here, else use N/A
- Extras A /B /C - Pick from an assortment of extra items like Living Pearl, Vortex cubes etc
- Glitches - If this planet is exotic choose the glitch
- Raw Ingredients - 5 cells of raw ingredients that are available on the planet for cooking, pick from the list
- Sentinel - Pick sentinel activity based on planet info page
- Flora - Pick flora presence based on planet info page
- Fauna - Pick fauna activity based on planet info page
- Number of Fauna - enter number from 0-16 of fauna based on planet info page
- Mode - Select mode
- Civilized - Pick the civilization that claims this planet (eg. Alliance of Galactic Travellers)
- Discoverer Gamertag - Enter the gamertag the planet is recorded as Discovered By on the NMS Online discovery database
- Discovered Link on Wiki - skip and use N/A unless advised otherwise
- Discovery Date - Date that it is marked as discovered in the NMS online discovery service. You can see this by scanning the planet sky or surface.
- Survey Date - The date you collected the data in the game (may not be the data you discovered something!)
- Release - Choose the game release of this data entry info
- Galaxy, Region, System in grey cells - DO NOT MODIFY
- User Notes - Anything you type here will be added into the wiki verbatim in the additional notes section of the system wiki page
- Day/Night Temp/Rad/Tox and variations for underwater and underground. Entry cells for different environmental numbers for observed weather conditions.
- Portal xx axes - latitude axes coordinates for planet portal
- Portal yy axes - longitude axes coordinates for planet portal
- Wiki link - skip for now
- Doc Sequence - do not edit for now
4. Enter data into Fauna DB for EACH fauna discovered on a planet or moon in the system
- instruction details to be added
5. Enter data into Starship DB for EACH starship in the system
- instruction details to be added
6. Enter data into Multi-Tool DB for EACH multi-tool in the system
- instruction details to be added
Creating A Region Page using DB Tool[ | ]
- OPEN the Google Sheet DB
- MAKE sure you have already entered data into the Region DB for the region you wish to create
- If you have systems entered in the spreadsheet, once you create their system pages on the wiki, the wiki region page will automatically add them to the region's system list on the wiki page.
- SELECT the Auto-Region tab
- ENTER or Pull down from the list the desired Region name in cell B1
- Pull down from the list the name the release of NMS in cell B2 that you wish to tag on the region page, in general always use the latest release name
- COPY the resulting highlighted cells in Column A starting with Row 4 (highlighted in light blue)
- Now open the web tab with the wiki page in a new window
On the NMS Wiki main page, SCROLL near the bottom to create a new page
- ENTER the name of the region page to create and press CREATE PAGE
- When the create page form LOADS, DO NOT use the predefined wiki templates, scroll down to the text entry window (light green-blue).
- PASTE the previously copied cells from the Auto-Region Tab into the wiki entry box
- press SAVE on the web page
Creating A Star-System Page using DB Tool[ | ]
- OPEN the Google Sheet DB
- MAKE sure you have already entered data into the System DB
- Make sure you have already entered all the data into the Planet DB for planets in that star system
- If you want the Multi-tools and starships in that star system to show up on the wiki page, they should be entered on their respective DB tabs also
- If you have a Multi-tool documented from the space station, the employee should ensure the multi-tool is in the Multi-tool DB so it can add the link to the Multi-tool page in appropriate section of the Space Station/Multi-tool merchant part of the page
- If employee has starships documented from this star system, the employee should ensure the starship is in the StarShip DB so the tool can add the link to the starship page in appropriate section of the Starship list part of the Star system page
- SELECT the Auto-System tab
- ENTER the desired starsystem name in cell C1
- COPY the resulting highlighted cells in Column A starting with Row 7.
- Now open the web tab with the wiki page in a new window
- On the NMS Wiki main page, SCROLL near the bottom to create a new page
- ENTER the name of the star system page to create and press CREATE PAGE
- When the create page form LOADS, do NOT use the predefined wiki templates, scroll down to the text entry window (light blue).
- PASTE the previously copied cells from the Auto-System Tab into the light blue box
- Note that the current version of the Auto-system page does auto populate the following subsections of the page: "Planets/Moons", "Starships" for any entries you made to the StarShip DB or Planet/Moon DB. Any future additions to those sections will need to be hand coded by the employee on the wiki
- You should upload relevant photos to gallery and adjust embedded image file names as appropriate in the wiki page.
- Note that there may be excess line breaks in some parts of the wiki page where user information in the database was incomplete and thus text could not be generated, these should be deleted as obvious.
- Note that the "PLANETS" and "STARSHIPS" table wiki code will start and end with an apostrophe when pasted into the wiki code page. This is an unfortunate limitation of the current tool, and those apostrophe will need to removed manually
Creating A Planet Page using DB Tool[ | ]
- OPEN the Google Sheet DB
- MAKE sure you have already entered data into the Planet DB
- SELECT the Auto-Planet tab
- ENTER the desired planet name in cell C1
- COPY the resulting highlighted cells in Column A starting with Row 8.
- Now open the web tab with the wiki page in a new window
- On the NMS Wiki main page, SCROLL near the bottom to create a new page
- ENTER the name of the planet page to create and press CREATE PAGE
- When the create page form LOADS, do NOT use the predefined wiki templates, scroll down to the text entry window (light blue).
- PASTE the previously copied cells from the Auto-Planet Tab into the light blue box
- Note that the current version of the Auto-planet page does NOT auto populate the following subsection of the page: "Location/Waypoints", "Notable Bases". These will need to be hand coded to the page by the employee
- If you have a minor settlement documented on Location list and has corresponding multi-tool to document, the employee can add the link to the Multi-tool page in appropriate NOTEs column of the Notable locations table
- If you have fauna to document from the planet, you should ensure the fauna is in the Fauna DB so it can add the link to the fauna specific page in Fauna table section of the of the Planet page
- You should upload relevant photos to gallery and adjust embedded image file names as appropriate in the wiki page.
- Note that there may be excess line breaks in some parts of the wiki page where user information in the database was incomplete and thus text could not be generated, these should be deleted as obvious.
- Note that the "Fauna" table wiki code will start and end with an apostrophe when pasted into the wiki code page. This is an unfortunate limitation of the current tool, and those apostrophe will need to removed manually
Creating A Fauna Page using DB Tool[ | ]
- OPEN the Google Sheet DB
- MAKE sure you have already entered data into the Fauna DB
- SELECT the Auto-Fauna tab
- ENTER the desired planet name in cell F1
- COPY the resulting highlighted cells in Column A starting with Row 9.
- On the NMS Wiki main page, SCROLL near the bottom to create a new page
- ENTER the name of the fauna page to create and press CREATE PAGE
- When the create page form LOADS, do NOT use the predefined wiki templates, scroll down to the text entry window (light blue).
- PASTE the previously copied cells from the Auto-Fauna Tab into the light blue box
- you should upload relevant photos to gallery and adjust embedded image file names as appropriate in the wiki page.
- Note that there may be excess line breaks in some parts of the wiki page where user information in the database was incomplete and thus text could not be generated, these should be deleted as obvious.
Creating A Multi-Tool Page using DB Tool[ | ]
- OPEN the Google Sheet DB
- MAKE sure you have already entered data into the Multi-Tool DB
- SELECT the Auto-MT tab
- ENTER the desired MT name in cell D1
- COPY the resulting highlighted cells in Column A starting with Row 9.
- On the NMS Wiki main page, SCROLL near the bottom to create a new page
- ENTER the name of the Multi-Tool page to create and press CREATE PAGE
- When the create page form LOADS, do NOT use the predefined wiki templates, scroll down to the text entry window (light blue).
- PASTE the previously copied cells from the Auto-MT Tab into the light blue box
- you should upload relevant photos to gallery and adjust embedded image file names as appropriate in the wiki page.
- Note that there may be excess line breaks in some parts of the wiki page where user information in the database was incomplete and thus text could not be generated, these should be deleted as obvious.
Creating A Starship Page using DB Tool[ | ]
- OPEN the Google Sheet DB
- MAKE sure you have already entered data into the Starship DB
- SELECT the Auto-Ship tab
- ENTER the desired MT name in cell D1
- COPY the resulting highlighted cells in Column A starting with Row 9.
- On the NMS Wiki main page, SCROLL near the bottom to create a new page
- ENTER the name of the starship page to create and press CREATE PAGE
- When the create page form LOADS, do NOT use the predefined wiki templates, scroll down to the text entry window (light blue).
- PASTE the previously copied cells from the Auto-Ship Tab into the light blue box
- you should upload relevant photos to gallery and adjust embedded image file names as appropriate in the wiki page.
- Note that there may be excess line breaks in some parts of the wiki page where user information in the database was incomplete and thus text could not be generated, these should be deleted as obvious.
Manual Submission By Email[ | ]
For employees that cannot create their own Wikipedia pages for discoveries, Email to the CEO at celabgalactic@gmail.com in the following order:
1. Separate Email for each star system name, Subject line: NAME of STAR SYSTEM , text of email to contain information noted above. Attach all screenshots for star system
2. Separate Email for each planet, subject line: NAME of STAR SYSTEM/NAME OF PLANET, text of email to contain information noted above. Attach all screenshots for that one planet
Note that employees that opt for submission by email, there is no guarantee of any rapid documentation page creation on the wiki. Simple guidance here, if you want your explorations to appear on a wikipedia page, please learn to create them.
Notes[ | ]
CELAB Galactic Industries strongly encourages all employees to document their own discoveries. The employee is free to add additional details to each planet including fauna, flora, locations of interest etc. (eg. See Cel-Cew Beta I as example)
If the employee submits discoveries by email, the company CEO will not commit to documenting additional information such as flora, fauna, notable locations, etc.
CELAB Galactic Industries[]

Bases * Explorations * Starfleet * Large Fauna * Fauna * Multi-tools * Starships
Discord
Instagram Twitter
Facebook
YouTube
Reddit:celabgalactic
Portal Repository