| The subject of this article is from the Echoes update.
The information from this article is up-to-date as of 13 February, 2024. |
The information from this article is up-to-date as of 13 February, 2024.
Sentinel Engagement is a strategy page.
Summary[ | ]
Sentinels may be attacked either on foot using the Multi-tool, or by starship or exocraft weaponry. They usually will not fire their weapons unless they have a clear line of sight to the player, so continuously holding up the Personal Forcefield may stall them from attacking, however they will fire immediately upon the shield being dropped.
Normal Drones[ | ]
Drones have no forward armor, and can be destroyed with relative ease from any angle. Drones attack periodically with laser blasters, and show a tendency to try to flank the player if more than one Sentinel unit is presently engaged. They normally hover a short distance above the ground, but can fly higher to pursue a flying opponent. Thus far they have not shown much tendency to attack a starship in motion, but will continue to track it until it leaves their range of sight. At wanted level 3 or higher, a Drone's successful visual and/or scan of the player will summon the appropriate backup of Quads and Walkers. Since drones can heal other units at any time, it is advised the drones are destroyed first in warning level 3 and beyond.
Armored Drones[ | ]
Armored Drones have forward plating, with an eyelet in the centre, and will face the player at all times while engaged to make use of this shield. When not tracking the player, most of their bodies are open to normal attack. They can be directly attacked through the eyelet; in fact their eye seems to be a critical spot, however it is a small target and Drones tend to move subtly, making a clean hit on the eye difficult.
Other than their armor, they appear to be identical to Normal Drones in every other way. They attack with the same blaster bolts as Normal Drones.
Sentinel Quads[ | ]
Sentinel Quads have two attacks they can perform, a charged laser attack and a lunge attack. Both attacks are aimed directly in front of the Sentinel and can be defeated using strafe tactics. However, Sentinel Quads can pass through the walls of player-made tunnels during their lunge attacks, so these units should be fought in open areas. Quads can be healed by Sentinel drones when their health drops low. This can be annoying if the drone ends up stuck under the ground. (Those drones can be killed with melee attacks, and the quad dealt with as normal.)
The quad's weak point is located on its rear, which is most easily exploited by attacking from an elevated position rather than by attempting to stay behind it as it jumps around. Another method is to get them to target your parked ship, allowing you to safely kill them while they harmlessly leap at the ship over and over.
Sentinel Quads are more aggressive than Drones, but may be easier to deal with than the smaller target Drones. At medium range, they will edge around the player, then pause and charge up their weapon and fire a sustained beam, telegraphed by a bright orange-red glow around its "eye" before firing. This attack is fairly easy to avoid, and the Quad is rooted in place while firing, making strafing an effective tactic as they will keep firing until the player moves outside their laser targeting radius or the weapon loses its charge. The beam does track the player, but the player can move faster than it can turn.
In close combat, they will charge at the player, dealing heavy damage and some knockback, and will continue to rush the player in such manner until distance is gained. This makes them tougher in confined spaces, especially in the tight quarters of caves or between large resources nearby.
Quads have been observed to remain in place while engaged, if the player is outside their beam range. This seems to occur if the Drones scan the player while the player is backpedaling from them with the Personal Shield up, causing the Quad to spawn in but be unable to attack due to the shield's barrier blocking line of attack. Even if the player engages the Quadruped while outside the beam's range, the Sentinel will only side-dodge at best, but otherwise remains in place.
As of update 4.20, Quads can go invisible for a short time, similarly to their corrupted counterparts. They usually go invisible for 2-3 seconds while in combat, however if inspected closely, a slight fog is visible where the quad is when in stealth.
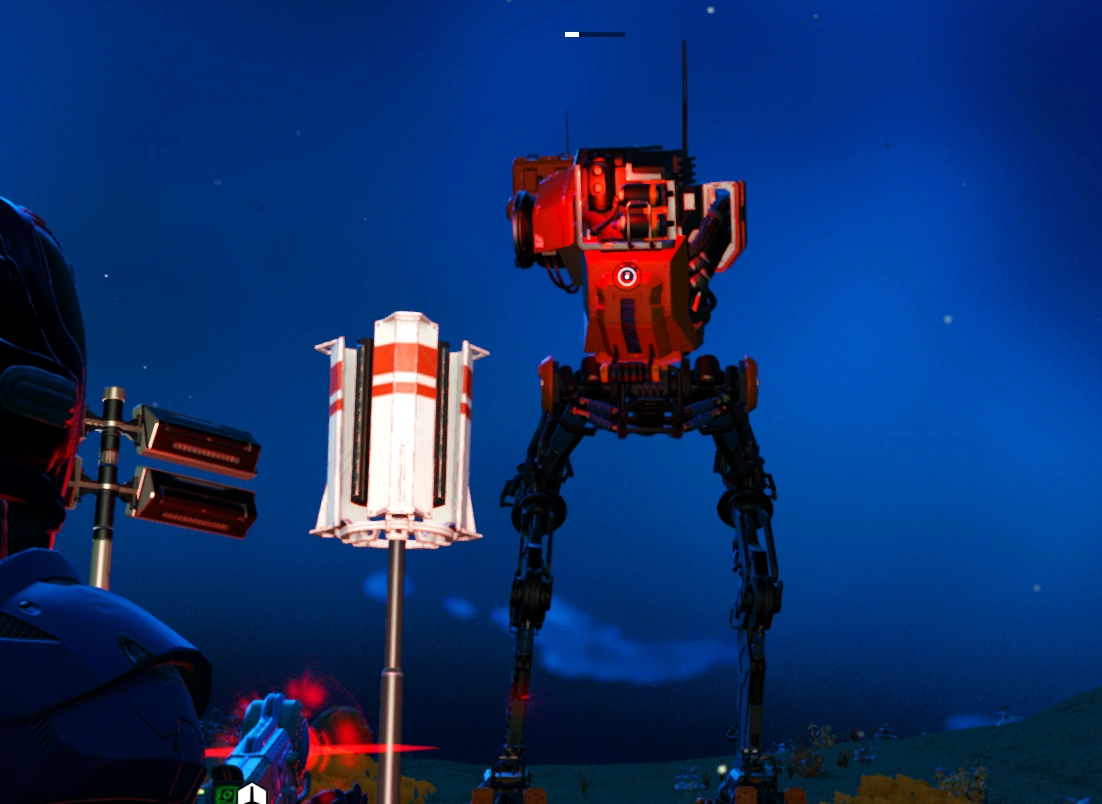
Sentinel Walkers[ | ]
Unlike Sentinel Quads, Sentinel Walkers attack exclusively using ranged weaponry. While their leg and upper torso armour is intact, they will regularly charge and sweep a laser across players, though this laser can be blocked with well-timed use of a Personal Forcefield. The laser tracks the player very strongly, though it can also be outrun by sprinting perpendicular to it at a great enough distance (or with enough movement upgrades). The lower torso takes no damage until all four pieces of leg armour and the upper torso armour have been broken, at which point the Walker releases a single barrage of plasma launcher-like explosives directly around itself and switches permanently to a rapid-fire projectile attack that can be dodged much more easily than the original beam attack. Once it has switched to this second phase, its core health can be damaged by attacking the torso. The weak point is a small grey plate near the top of the lower torso. Once it is dead, its Walker Brain item can be retrieved from the Combat Supplies container it drops.
The weak point of a Sentinel Walker being aimed at directly, underneath the cross hair.
Arguably, the second stage of combat is much easier to deal with, as the projectile bolts have a lower flight speed rather than being a sustained hitscan laser, so strafing at a distance can prevent any bolts from hitting. Circling the Walker or changing strafe direction once the Walker's magazine is empty can lock it into a cycle of turning and then inaccurately opening fire, effectively leaving it completely open. The reload time on the projectile attack is fairly long, providing a good opportunity for a player to land attacks against it.
An arguably easier strategy than attempting to fight on an open field is to use the terrain manipulator's create mode to build a column in front of the walker that goes all the way up to height of the laser, then build a wall at laser height on either side, forming a wide T shape. The walker has poor pathfinding and will simply fire into the rock wall instead of walking around this structure, giving you as much time as you need to engage the other sentinels. Once its reinforcements are gone, a hole can be cut in the bottom with the terrain manipulator's mine mode, exposing its legs to fire from even the weakest weapons. If you have a plasma launcher, you can cut a hole out of the top of the structure just big enough to let indirect fire through to the torso without exposing yourself to the laser. The edges of the upper torso can still be exposed to direct fire in this way, but it takes a lot of care not to let the laser through.
Walkers are also much more cognizant of the player's presence, and appear to have a broader range of view than other sentinels. Hiding inside a building does not always avoid detection from Walkers; if they are close enough, they can still detect the player and potentially damage them.
Once a player has developed a decent skill level with the plasma launcher, it is an exceptionally effective tool against the walker. A fully upgraded launcher (three S-tier modules or similar on a higher-class tool) can one-shot any individual armor piece, and is likely to break two or more leg armor sections in one hit if aimed well. A max launcher will also destroy the core torso in as few as three hits. The scatter blaster is also highly effective; a moderately upgraded blaster can break an individual armor plate in two shots, and destroy the torso within one magazine. Combined with effective movement, these two weapons can be utilized to take down walkers with a very high level of efficiency (often under 10 seconds with practice).
Weapons choice[ | ]
Sentinels may be engaged with the Multitool weapons, and the player may want to make use of the Terrain Manipulator to create a bunker or small cavern from which to attack if they feel they are not able to attack the Sentinels head on. Alternatively, it may be prudent to utilize the stronger weapon systems of the starship or exocraft. The starship's constant motion while on planets necessitates a looping flyby method of attack, but the slight homing capability of the reticule makes weaponry easier to use against them. Additionally, most, if not all, terrestrial Sentinels do not attack the starship while it is flying.
Exocraft may be used as well, however, the player should be aware that the limited turning mobility, as well as being on the ground, may present substantial limitations due to the terrain in addition to individual exocraft speeds. Sentinels will attack Exocraft as well. Of additional note, the exocraft's upgraded mining laser appears to be much more effective than its upgraded weapons, dealing significant damage faster and with greater precision, along with its ability to sustain fire without overheating. When engaging Sentinels, range is usually preferable, and taking Drones out at a distance before they can see or scan the player usually - but not always - prevents a Quadruped or Biped from spawning even if the player has reached the appropriate threat level. The Personal Shield may be used to take on their laser attacks, but will not stop Quad charges.
Walkers and Quads have been shown to sometimes disappear when the player boards their starship, and often will not spawn at all if the player increases their wanted level by destroying Drones without leaving their ship. Walkers or Quads that have disappeared are still present and will detect the player in their starship if they pass by close enough, but cannot be targeted, requiring the player to leave the area and reset the detection or attack more Drones. Boarding the starship does not de-spawn Drones, however, and they will pursue the ship and continue moving in roughly the direction they last saw it, including up vertically in the air. Engagement of terrestrial Sentinels with the starship must be done at medium to far range, as close range will result in them taking no damage and being too close to the ship to be naturally targeted by the reticule.
When planning to challenge terrestrial Sentinels, the player should have appropriate weaponry ammunition and recharge materials on hand. Walkers in particular do not easily lose track of players, making grabbing recharge materials on the fly a harrowing endeavor. Carbon-based weapons such as Blaze Javelin or the Exocraft weapons or mining beam are good picks for backup weaponry, as carbon can be easily obtained on most planets in a pinch. Unlike the Exocraft's mining beam, the Multitool mining beam does not deal as much damage, so Blaze Javelin is a better use of the carbon charge.
While being dangerous to the player, Plasma Grenades are very effective against Walkers and Quads. One fully upgraded grenade kills a Quad instantly, while a Walker will need 5 to 8 grenades (occasionally a single grenade can destroy all four Walker leg armour plates).
Note: While hitting regular animals with an exocraft will usually kill them, Sentinels do not take damage from Exocraft impact. In fact, Exocraft can get flipped over by trying to run up onto the Sentinel, particularly common with Drones spawning from the ground while traveling. Sentinels are not alerted on impact.
Sentinel Starships[ | ]
Starship drones are little different from Pirates in terms of combat tactics or approach. Sleek and triangular in build, they are also somewhat flat, presenting a slightly smaller area to hit. They carry a Photon Cannon and a Phase Beam, and do switch between the two, possibly on the same overheat mechanics as the players' weapons. For longer range, they use their Photon Cannons, while switching to Phase Beam for medium range. Phase Beam in particular is quite powerful. They can and will chase players into a planet's atmosphere, and will remain engaged until the player either lands or destroys them. Landing switches the PWL response from aerial to terrestrial, summoning Drones to seek the player out instead. On their own, Sentinel Starships are not much different from a Pirate. Their accuracy and frequency of weapon change seems to increase with PWL.
Like any dogfight, it is advised to move as much as possible to minimize enemy targeting, and try to attack from behind or directly from the front. Most space attackers in No Man's Sky will break off their head-on attack to try to evade incoming damage, and Sentinels are no different, so a rocket salvo during a headlong charge will likely force them to break off and spin to the side to avoid further attack. Sitting still and letting them charge and present themselves as a target is another option, however their Phase Beam makes this a risky tactic.
Sentinel Starship Carrier (Sentinel mothership)[ | ]
The sentinel starship carrier is a freighter that approximates the medium size for sentinel freighters. There are four key differences here:
- it doesn't have a place to land in
- spits out 3-5 sentinel starships
- has a red/yellow colored engine thrust at the back (instead of the usual blue)
- weapons will automatically target the player
- can now be fully destroyed
Each of the five mid-segments has one main turret; the front has two extra turrets, and the back has one extra turret; on both sides. The weapons, individually, will have a 50/50 chance of being either a phase beam-like weapon that shoots a continuous beam for a few seconds, or a rapid fire cannon that shoots approximately five laser bolts a second. Both turrets are able to cause catastrophic damage to the player's starship if they are not shielded well.
When engaging the mother ship, the player is advised to bring a few stacks of sodium to the fight, as the freighter's weapons will chew through the player's shield, no matter how powerful. While attacking, do not target the small ships. Instead, head for the weapons on the carrier as these turrets are far more powerful than the starships. Try to get close to the freighter and look down the row of main turrets at an angle where the turrets are right behind one another. This way the main turrets can be wiped out easily. Once all turrets and starships are destroyed, you can easily destroy the freighter by just hovering in one spot and shooting at it.
Another advanced strategy when engaging is to quickly boost a bit out of range of the Carrier's weapons and engage the fighters quickly. Once they are destroyed use one of the following two options:
- use a long range weapon such as well equipped Photon Cannons to shoot off the Carrier's armaments rendering it weaponless
- if you have a close range weapon like the Positron, proceed to do strafing runs, pulling up at an average speed taking out as many of the side cannons as possible before boosting past and letting your shields recharge. It is recommended that you have some type of shield boost and confidence in your selected ship/loadout for the strafing method.
The cannon fire is the most accurate but slowest and easy to stay ahead of if you keep up a decent speed. The laser cannons are extremely inaccurate and will fire out at an arc before proceeding to sweep across their targeted area. Best way to avoid the lasers is to keep a vertical movement in comparison to the Carrier because they don't track as well as the rapid firing cannons. As long as you keep moving you will avoid much of the damage from the rapid cannons anyway. Rinse/repeat/strafe until the Carrier is silent.
The carrier may have cargo pods that can be destroyed.
Release History[ | ]
- SentinelUp - More sentinel types added
- Interceptor - Carriers can now be destroyed
- Update 4.44 (Echoes) - Carriers now spawn with Shield Generators