| The subject of this article is from the Atlas Rises update.
The information from this article is up-to-date as of 23 July, 2018. |
The information from this article is up-to-date as of 23 July, 2018.
The Interloper's Guide to the Galaxy is a user guide.
Summary[ | ]
The Interloper's Guide to the Galaxy is a complete guide to the Atlas Rises version of No Man's Sky.
Authors / Contributors[ | ]
United Federation of Travelers main website is the Federation Subreddit.
- 7101334
- AngriBuddhist (Economy Infographics)
- JBL839 (Economy Infographics)
- SillyCatFurryHat (Multitool Combat)
- intothedoor (Crafting/Gas Harvesting)
- nexus6789 (Tricks & Exploits)
General Information[ | ]
Starship Display Screens[ | ]
Although the arrangement of the screens will differ (for example, the screens in Fighters are always on the bottom of the cockpit window, while Haulers sometimes have them above the window), every ship's screens provide the same basic information. These example pictures were taken in a Fighter with a "Parabola X" cockpit.

Figure 1

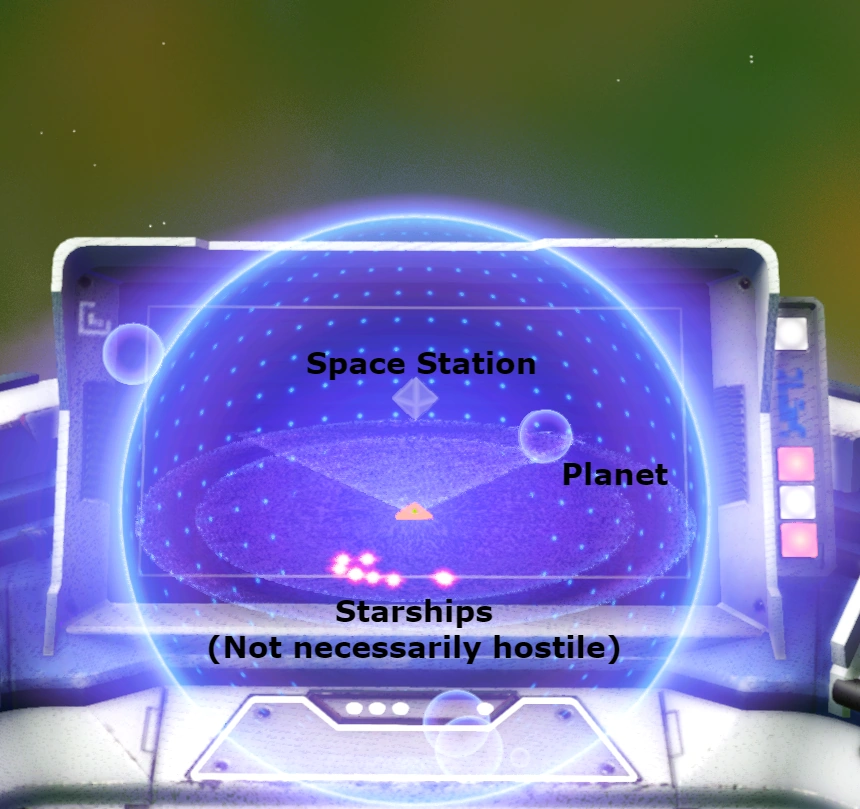
Figure 2

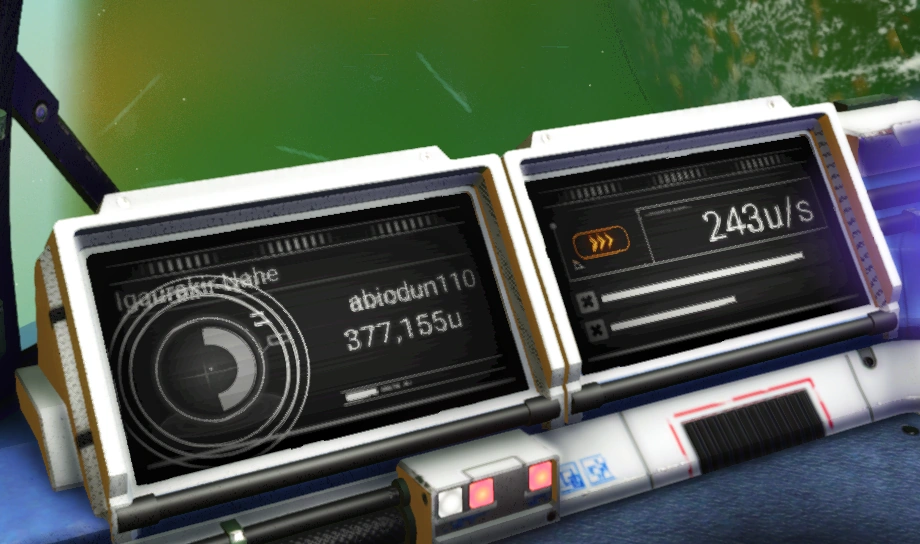
Figure 3

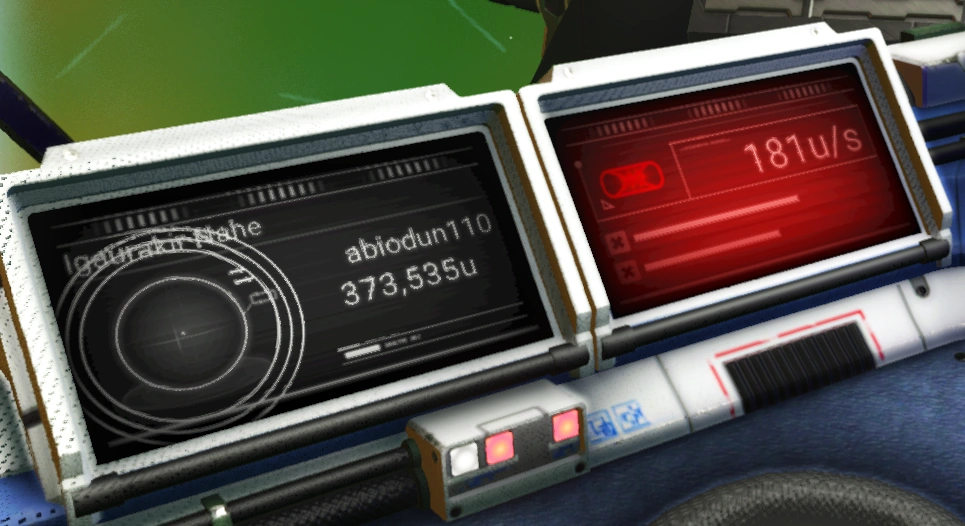
Figure 4
Figure 5
Figure 6
Figure 7
Figure 8
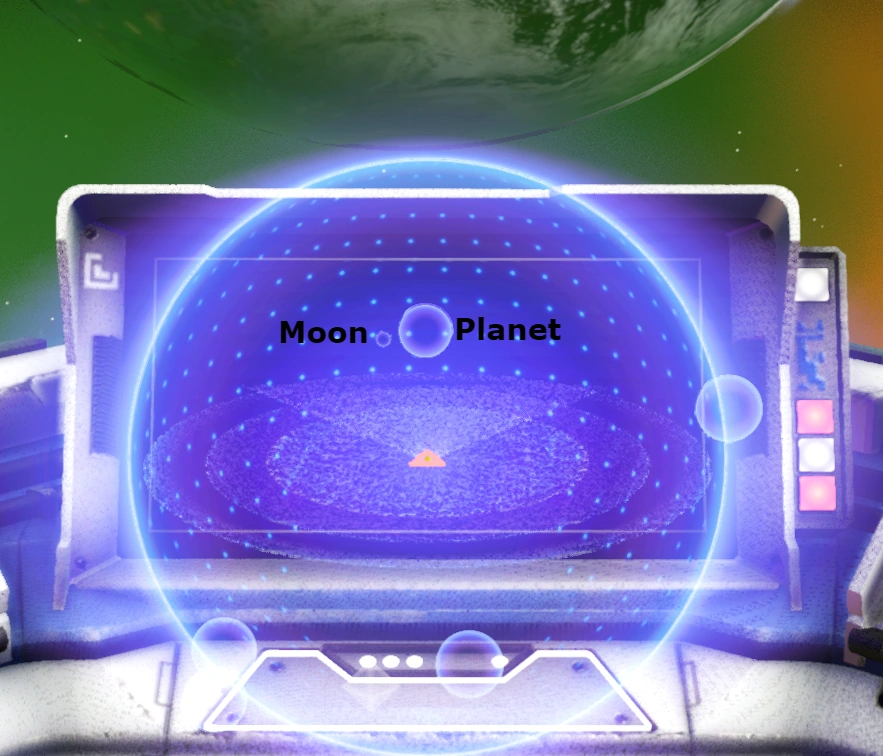
- ) Figure 1 - A moon and a planet are displayed.
- ) Figure 2 - A Space Station, Planet, and small group of Starships are displayed.
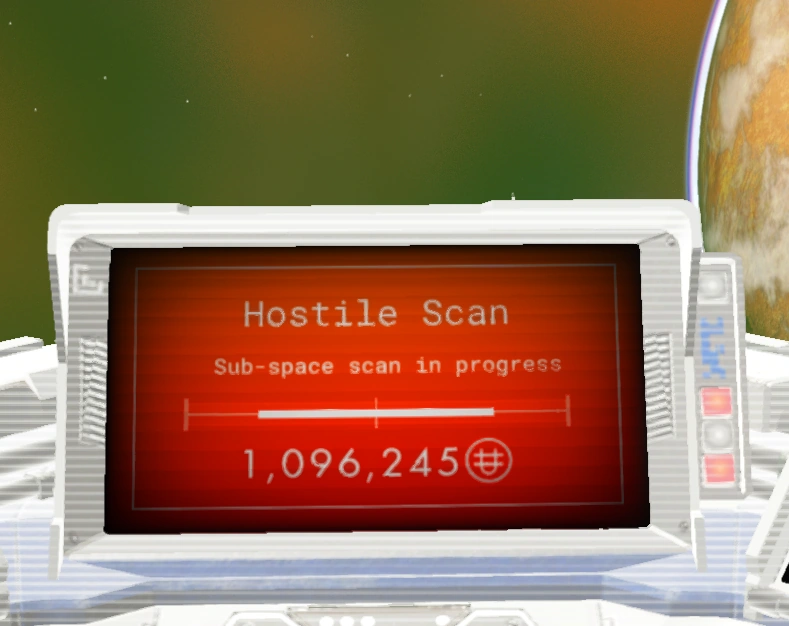
- ) Figure 3 - The circle on the left-most screen, which is half-filled in with white, signals when you will either be scanned by Hostile Pirates or have a Bounty Ship appear. When the white bar runs all the way out, the event will occur. The screen next to this "Scan Counter" screen is your Speedometer, in u/s. This displays how fast your starship is going at any given time.
- ) Figure 4 - These are the same two screens, but the one on the right is red. This signifies that your Pulse Engine is currently jammed (either by proximity to a Space Station/other large object, by Pirates or Sentinels, or by some other factors).
- ) Figure 5 - The second stage of a Hostile Scan, after the "Scan Counter" runs down. When this bar runs out (it "meets in the middle," with both the left and the right side disappearing into the center of the screen) the hostiles will begin warping in. Until they begin warping in, you can press down on the D-Pad (or PC equivalent) to communicate with them (in most circumstances). With Pirates, for example, you can pay Units to prevent the attack. You can also use that conversation to use a Defence Chit to summon Sentinel aid.
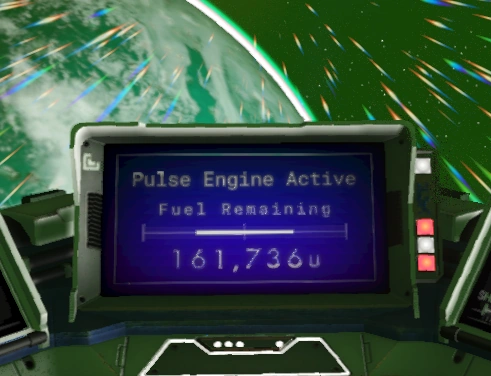
- ) Figure 6 - Your Pulse Engine display, essentially one of your two "gas tanks" (the other being your warp engine). Like the second-stage Hostile Scan display, this one runs out from both the left and the right, meeting in the center of the screen once you're completely out of fuel.
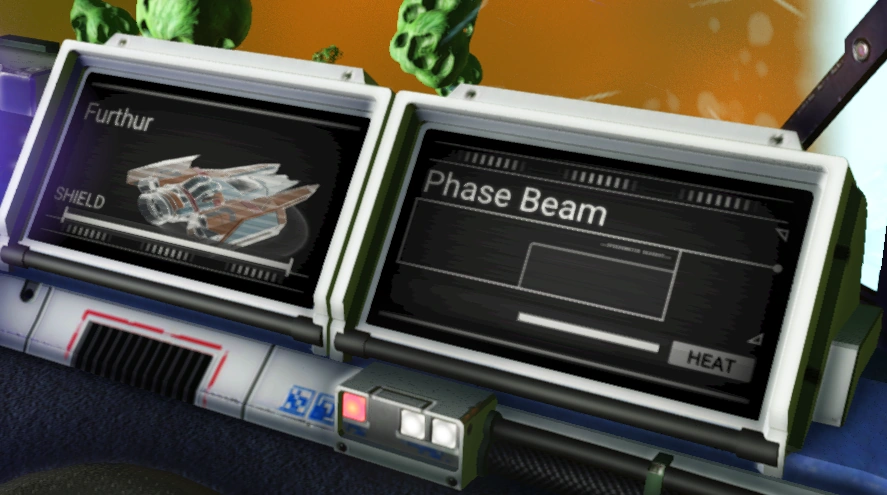
- ) Figure 7 - These screens display your starship name and shield (left) and your currently selected weapon (right). Note that the "Shield" bar is functional and will decrease as you take damage, but the "Heat" bar appears to be nonfunctional and doesn't change when a weapon overheats or cools down. You can also press right on the D-Pad to "lock on" to other ships, which will cause them to appear on your display screen in place of your own ship, until you go out of range or they are destroyed.
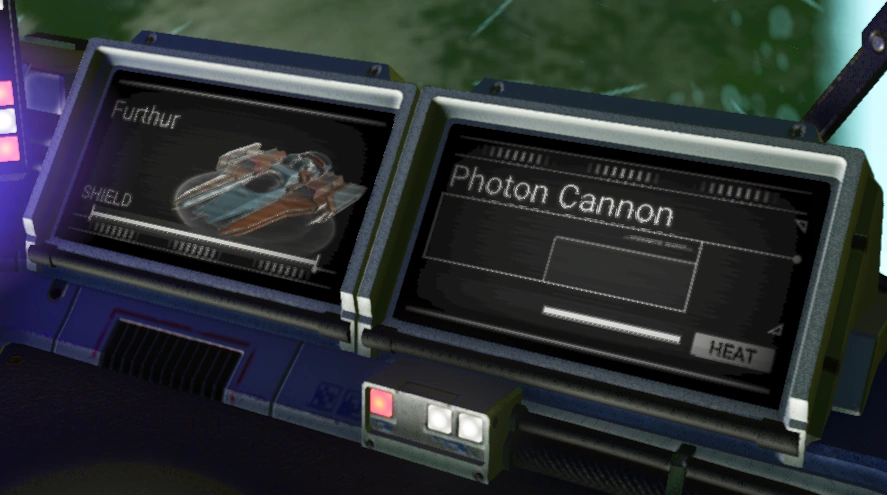
- ) Figure 8 - Same screens, displaying the Photon Cannon instead of the Phase Beam.
Miscellaneous Tips[ | ]
- When warping in a Freighter, it will display Economy and/or Conflict information on the galaxy map if your active starship (the last starship you exited) has the appropriate scanner installed (see Economy Scanner and Conflict Scanner).
Combat[ | ]
Starship Combat[ | ]
Travelers may engage four primary types of targets:
- ) Hostile starships - Pirates, Sentinel Interceptors, or other NPC pilots if angered.
- ) Shipping Freighters - Freighters with no defensive capabilities at all, which completely explode when destroyed. (Damages your reputation with that race.)
- ) Standard Freighters - Freighters with defense turrets, both capital and non-capital variants, which hold multiple containers that can be destroyed without destroying the entire ship. (Does not damage your reputation.)
- ) Sentinel Motherships - Heavily armored, special Sentinel freighter which constantly spawns more Sentinel Interceptors. Only appears when the player is in space with a 5-tier wanted level.
Photon Cannon[ | ]
- Deals double damage if target is struck from behind. ("2x" marker will appear on screen.)
- Medium rate of fire before upgrades; high rate of fire after all upgrades.
Phase Beam[ | ]
Infra-Knife Accelerator[ | ]
Cyclotron Ballista[ | ]
Positron Ejector[ | ]
Rocket Launcher[ | ]
Multitool Combat[ | ]
Multi-tool combat is exclusively against sentinels and whatever critters you decide to massacre for the sake of Nanite Clusters. While the Multi-tool is the only weapon you receive, it can be upgraded in many different ways to suit a wide variety of combat styles. Here is a simple breakdown of the weapon types:
Blaze Javelin - Long range, single shot beam.
Boltcaster - Mid-long range, assault weapon.
Mining Beam - Mid-long range, sustained beam.
Plasma Launcher - Short range, plasma grenade launcher.
Pulse Spitter - Mid range, burst weapon.
Scatter Blaster - Close range, shotgun.
Multi-tool technologies are sold on Vy'keen Space stations.
Useful information for fighting sentinels
Sentinel drones have a weakness in the direct centre of their red "eye". When hitting the weak point, damage is increased by approximately 35-50%*, as opposed to hitting the shell. Using the mining beam is an easy way to hit it, and an un-upgraded scatter blaster can one-shot drones if you hit.
Sentinel Quads are like turtles when you hit them with the plasma launcher - some can get themselves righted, but most of them can't. Knock them over and enjoy your personally-delivered titanium.
- Research is still underway by the Aesir Ascendancy to further validate and substantiate this claim.
Economy[ | ]
See Economy page for more information.
This section is meant to provide users with information to help them understand and benefit from the various economies and money-making techniques utilized by players.
Infographics[ | ]
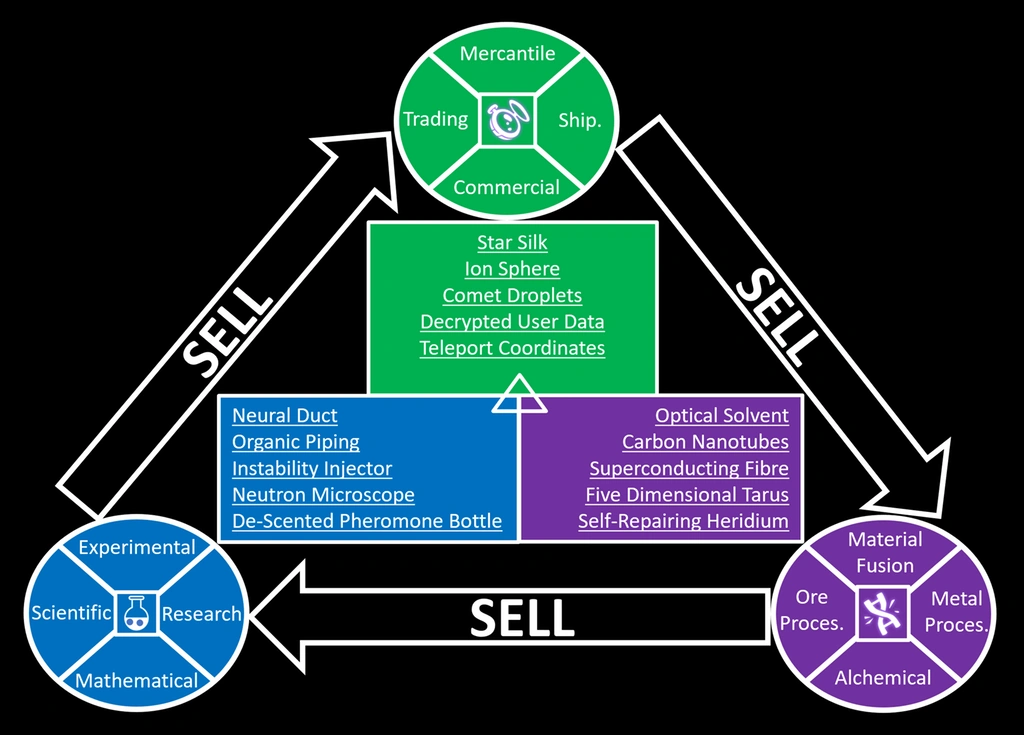
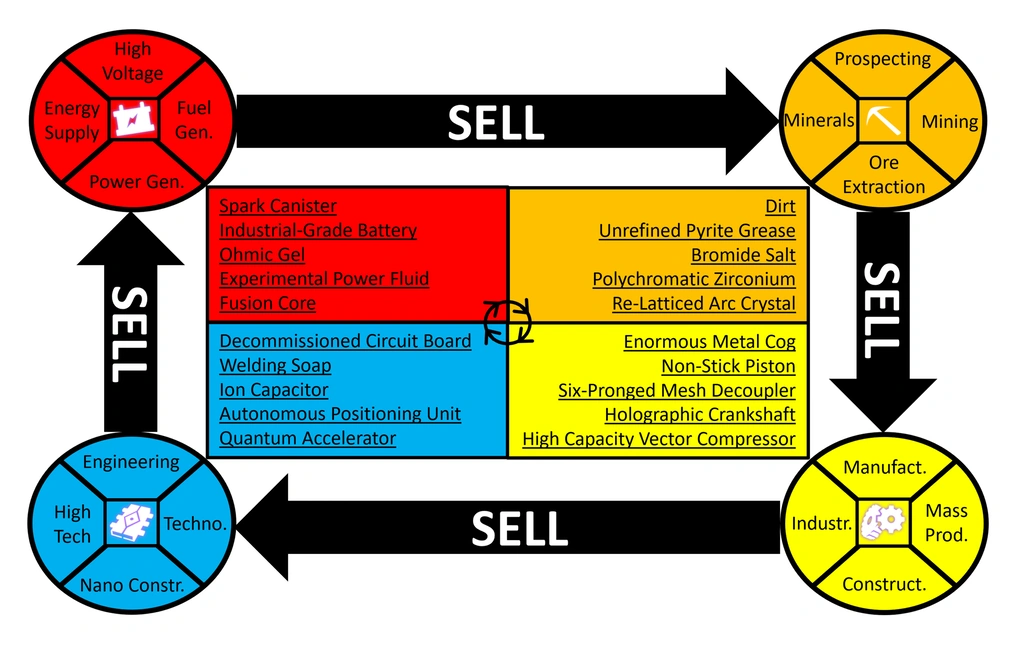
Trade Route Logic Flowcharts
These charts display which types of economies you should sell certain products in, with the products being associated with other types of economies. Note that trading on trade routes is generally regarded as a less viable means of making money than farming/item manufacturing.
Trading, Advanced Materials, and Scientific economy trade route logic. By JBL839.
Power Generation, Mining, Manufacturing, and Technology economy trade route logic. By JBL839.
Exploration[ | ]
Fully Exploring a Star System[ | ]
This section doesn't refer to exploring every square inch of a system. Rather, it refers to examining all the unique content in a system. Things like: starships, multitools, resources, fauna, and technology for sale. Examples of content that would not be included might be monoliths (text given is not specific to location), blueprints/manufacturing centers/production facilities (not specific to location), or similar content.
Locating Multitools[ | ]
Within a solar system, each planet has a unique multitool. To check a planet's multitool, use the following technique:
- ) Save your game near a multitool box.
- ) Reload your save.
- ) After reloading, your multitool will be "locked" to that planet's model. For example: if you load on Planet A, your pool of available multitools will be locked to Multitool A. If you visit a multitool box on Planet B, it will show Multitool A still. Once you reload your save on Planet B, it will show Multitool B.
- ) If you load Multitool A at a box on Planet B, C, D, etc, it may have a different class and/or bonuses than it did on its "native planet."
- Space Stations may or may not have their own unique multitools, available from NPC aliens.
- See this thread for more information.
All buildings (aside from Trade Posts) with landing pads will have multitool boxes, and Beacons (the giant, permanent antennas, not the player-constructed beacons) will lead you to such buildings when interacted with.
Locating Starships[ | ]
As explained on the Starship page, "Every star system has 21 different ship designs: 7 shuttle types, 3 ships of each specialist type (Fighter, Hauler, or Explorer), 1 Exotic, and 4 other specialist ships based on that system's dominant race. S-class ships will spawn more often in rich economies."
In other words,
- Korvax: 7 Shuttles, 3 Fighters, 3 Haulers, 7 Explorers, 1 Exotic
- Gek: 7 Shuttles, 3 Fighters, 7 Haulers, 3 Explorers, 1 Exotic
- Vy'keen: 7 Shuttles, 7 Fighters, 3 Haulers, 3 Explorers, 1 Exotic
[ | ]
There are currently two primary means of navigation: Warp Engine (Freighters or Starships), or Portal travel.
Warp Engine Travel[ | ]
This section applies to warp engine travel using either standard Starship warp engines or Freighter warp engines. The technique is the same for both; freighter engines are just more powerful and can travel a greater distance per jump.
Quick Guide[ | ]
- ) Check coordinates by building a Signal Booster.
- ) Input them into Pilgrim Star Path, and follow the directions given (especially "Degrees from Center").
- ) Click on 6th tab (? tab) if you need help.
- ) Stop and check your coordinates every 5-10 jumps to make sure your path is accurate.
- ) Use Pilgrim Path's Local Mode, XYZ coordinates, and/or the in-game "Scan for Discoveries" feature to locate your destination
once you're within 1 or 2 jumps.
Detailed Guide[ | ]
This is the classic means of traveling around the galaxy, and the only option until Update 1.30.
1) Build a Signal Booster by pressing up on the D-Pad, or PC equivalent, and opening the Build Menu.
2) Walk up to / hover over your Signal Booster, or interact with it. You will see a four-or-five-letter "word" followed by a string of coordinates, which will look something like
3) The four-or-five-letter "word" is useless; ignore it. Enter the coordinates into Pilgrim Star Path.
- Pilgrim Path is a 2D map, but provides info for 3D navigation.
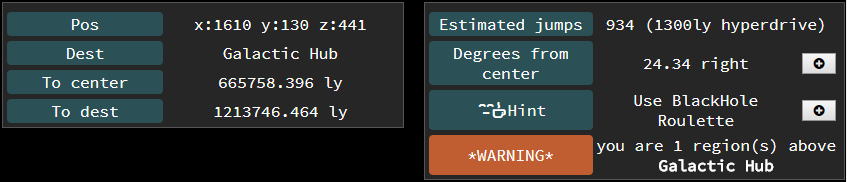
- "Pos" tab displays your current position in X, Y, and Z coordinates.
- "Dest" displays your current destination (can be changed in 3rd and 4th tab; set to Galactic Hub by default)
- "To center" displays your coordinate's current Distance to Center.
- "To dest" displays your current linear distance from your destination.
- "Estimated jumps" displays the approximate number of jumps it will take you to reach your destination. This assumes a perfectly straight path. Make sure to set your proper Warp Engine Range in the 5th tab, or this value will be inaccurate.
- "Degrees from center" is the most important tool for long-range navigation, and the closest thing we have to a compass. It tells you how many degrees you must turn after facing the center in order to reach your target. In other words: Look through your current star like a "scope" directly at the giant bright light on the Galactic Map, and then approximate the number of degrees you have to turn.
- There is no way to 100% confirm that you turned the correct number of degrees before jumping. Interlopers new to long-distance navigation should stop and check their coordinates every 5 jumps to make sure they're on an accurate course, while more experienced navigators might stop every 10+ jumps.
- "Hint" section just tells you what the best approach to your current situation is. "Travel directly" means use your warp engine.
- Click "Draw B. Hole Ring" to mark the map with a red ellipse / oval - this is the radius where a Black Hole might spit you out from your current location.
- A "WARNING" may pop up notifying you that you are either above or below your target region. Ignore this until you get within 10-15 jumps, then start trying to correct it. Region names are displayed on the Galaxy Map, so it's easy to tell if you've gone up or down one region or more.
4) Use Pilgrim Path to navigate to your destination based on the directions given, explained in the step above.
5) Once you get within 1 jump away, you may be able to use the in-game "Scan for Discoveries" feature on the Galactic Map to locate your target destination (assuming it has been uploaded by another player).
- If not, try opening Pilgrim Star Path in a new tab as well as your current tab.
- Input the coordinates for your destination as your current location (as if you were already there).
- Compare your actual position's XYZ coordinates with your destination's XYZ coordinates. The X and Z axes are displayed on Pilgrim Path in the upper left corner, while Y axis is just up and down.
- This information may help you determine exactly where to go.
6) You can also try using "Local Mode" on Pilgrim Star Path by clicking the button on the upper right-hand side of the Map tab. In Local Mode, you can judge differences within a very small area of space. If you're still too far from your desired destination, it won't show up on the Local Mode map.
Portal Travel[ | ]
Added in Update 1.30 - Atlas Rises, Portal travel is an easy way to reach a destination. However, various glitches have been associated with it, so make sure you always keep a save from before you entered the Portal until you regain access to your starship.
Permanent Portal travel will require abandoning your current home base.
This infographic also demonstrates the process detailed below.
If you are using a Portal with multiple other people, don't stand in front of the "dialing mechanism" while paused or otherwise not playing, or you will block it for them.
Quick Guide[ | ]
- ) Activate a Portal & input the glyph sequence (Pilgrim Path's second tab can convert coordinates to Portal glyph sequences)
- ) Once you emerge from a Portal, scan for a base. Scan multiple times until you get one close enough.
- ) Claim the base as your own.
- ) Return through the Portal. Get in your ship, and fly to the space station. (This will create a new save when you exit in the station.)
- ) Use the teleporter in the space station to return to your base on the other side of the Portal (the side you entered the glyph sequence for).
- ) You will now have access to your starship and can resume normal exploring.
Detailed Guide[ | ]
- ) Locate a Portal. This is most easily accomplished by finding a Monolith, and then selecting the "Find a Portal" option. Monoliths can be found with a Signal Booster.
- ) Power each glyph to activate the Portal. Fully charging a Portal will require 300 Heridium, 250 Carbon, and 250 Iron. You may also use more rare elements from the same "family" (i.e. Platinum instead of Heridium, Titanium instead of Iron), which will consume fewer resources.
- ) Input your glyph sequence, the series of symbols. The easiest way to obtain glyph sequences is to use Pilgrim Star Path's 2nd tab, which converts standard coordinates into glyph sequences.
- ) Enter the Portal, and emerge on the other side. Make sure you maintain a "fresh save" from the original side of the Portal, as glitches are known to occur.
- ) Build a Signal Booster, and scan for habitable bases. Repeat the scan until you get one which is close enough to walk to (or drive, if you bring the materials for an exocraft geobay). You will not have access to your starship or freighter during this period.
- ) Claim the habitable base as your new base.
- ) Return through the Portal.
- ) Fly to the space station. (This will create a new save; if you need to reload for any reason, make sure repeating this step doesn't overwrite your original-side-of-Portal save.)
- ) Use the space station teleporter to return to "side B" of the Portal, where you claimed your base.
- ) You will now have access to your starship again, and shouldn't have to worry about overwriting old saves. Just to be safe, save in the space station or freighter, where "loading underground" glitches won't happen.
[ | ]
See "Navigating to the Galactic Hub" for information on navigation by Portal and Coordinates / Warp Engine.
Quadrants[ | ]
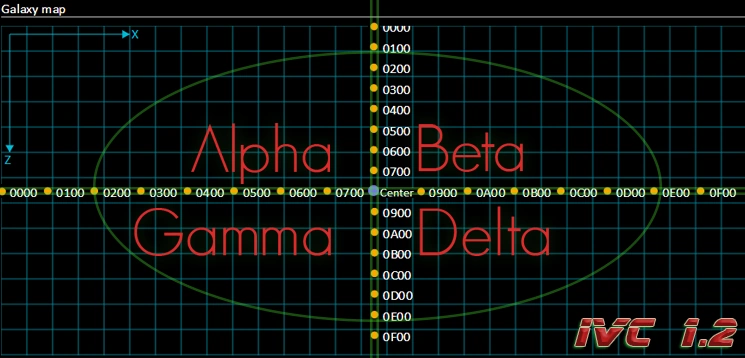
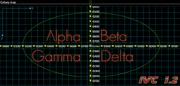
Quadrants, image by InterGalactic Voyage Corridor group.
Each galaxy can be divided into four quadrants, due to the "candybar-like" shape of the NMS galaxy - rectangular and, in comparison to its width (X) and length (Z), relatively flat (Y). Quadrants are often useful in communication between players, as they can quickly allow you to determine whether or not you're "in the neighborhood" without needing to actually check coordinates.
In a clockwise rotation starting in the upper-left corner, these quadrants are Alpha, Beta, Delta, and Gamma.
See the Quadrant page for more info.
Checking a System's Distance to Center (DTC) Accurately[ | ]
Prior to Update 1.30, players could easily check a system's Distance to Center, or DTC, by clicking on it while on the Galaxy Map. After 1.30, you can only accurately check the DTC of the system you're currently in by going to the Galaxy Map and selecting the "Galaxy Center" waypoint. It will say, for example, "644000 LY" (LY standing for light-years).
You can estimate DTC by placing your camera "inside" of the star and checking the value given in the upper left-hand corner of the Galaxy Map, but this is rarely a useful measurement for navigation purposes.
[ | ]
The Economy Scanner breaks stars into 7 possible colours (see Economy) instead of the default 4, which nearly doubles the player's ability to distinguish between stars.
After installing the Economy Scanner on your ship, go into the Galaxy Map and press up/down on the D-Pad (or PC equivalent) to select the Economy filter. Note that this is only useful if you know what type of economy your target system has.
Permanently Marking a System[ | ]
Systems can be permanently marked on the Galactic Map by leaving a mission uncompleted within that system. This video is one example of this technique in action, where farms (Scan Minerals icon), racetracks (Exterminate Fauna icon), and a specific base (Pirate icon) have been marked in the Galactic Hub on the Galaxy Map.
- Accept a mission in the desired system.
- Progress mission to the point where it's specific to that system. This is the tricky part - some markers will move with you when you warp. Usually a good idea just to get it to the "Return to Mission Agent" stage.
- Do not actually complete the mission. This is also somewhat tricky, as missions may be returned to Mission Agents at any system, even if the marker is on a different system.
- The mission icon will serve as a permanent marker on the Galactic Map, which can be removed by completing or abandoning the mission.
This can be used to great effect with some degree of organization. Below are some examples of how missions might be used to mark systems, but they are certainly not "rules." No one will see these markers except you, so use whatever works for you.
- Scan Flora (Leaf Icon) = Farm in this system
- Exterminate Planetary Creatures (Footprint Icon) = Noteworthy fauna present
- Collect an Item (Treasure Chest Icon) = High wealth system or desirable resources for sale
- Raid a Planetary Harvester (Unit Bag Icon) = Good location for selling a certain product
- Repair a Damaged Item (Wrench Icon) = Desirable Starship or Freighter for sale/salvage
- Hunt Pirates (Skull & Stars Icon) = Desirable Multitool for sale/salvage
- Eliminate Sentinels (Sentinel Icon) = Good location for freighter piracy
[ | ]
Are you within a Civilization or otherwise very close to another player, too close for coordinates to be useful, and you need to give them directions (or ask for directions) to a specific system?
Providing the following information will help guarantee easier ability to locate the system:
- Region, and upper or lower half of region.
- Nearest other region(s) (if applicable)
- Economy type (See Navigating via Economy Scanner)
- Primary native intelligent lifeform / alien race
- Star colour
- Nearest red, blue, or green stars (if applicable)
- Nearest well-known stars (if applicable)
- Distance to Center
You can also use Portals to travel even a short distance, set that system as your custom waypoint after stepping through the Portal, then return back to your original "Side A." Then get in your ship and warp to your custom destination for easy navigation. However, some people may not have all the glyphs or may not wish to waste the Warp Cells. So please provide the information above for important discoveries.
Resources[ | ]
Obtaining Warp Cell Materials[ | ]
See Economy for more information regarding system economy and wealth types.
- Thamium9 is best obtained by purchasing it in high-wealth economies, where you will be able to purchase hundreds of units of Thamium at a time. Freighter Piracy is also a viable option if you have a well-equipped starship. If you only need to craft 1 or 2 cells, it's probably most convenient just to shoot some asteroids.
Biome-specific Resources[ | ]
Certain resources only appear in specific biomes.
- Star Bulbs found only on Lush/Humid planets
- Solanium only on Hot planets
- Frost Crystal on Cold planets.
- Cactus Flesh on Dry/Desert planets. (The game sometimes refers to these as "Barren," but that is more often used for Dead/Low Atmosphere planets.)
- Gamma Root on Radioactive planets.
- Fungal Mould on Toxic planets.
- Coprite in Hydroponic Trays as there is no valid biome.
Base Building / Player Bases[ | ]
Travelers can create player bases in essentially any star system. Potential base sites can be located by placing a Signal Booster, then choosing the "Habitable Base" option. Most, if not all, planets will have multiple bases, with the exception of Barren / Dead planets.
Multiplayer Dynamics[ | ]
As of the Pathfinder update, bases constructed by one player are visible to any player (on the same game mode and platform) who visits the system where the base is located.
However, only one base (excluding your own) is visible at one time. This means if two players besides yourself were to occupy the same system, you would only see one of their bases. The most recently updated base is the one which will appear to any visiting players. Due to this, it's become common courtesy in No Man's Sky to ask for permission, or to disable Base Sharing in the Options menu, before moving into the same system as another player.
You can check if a player base constructed by another player is visible in your system by performing a scan with your starship while in space. If another player's base is present, a flag symbol will appear, with the text "(Player Name)'s Base" underneath. A notification which simply says "Habitable Base detected" is not another player's base, just a potential base site.
Constructing Multiple Bases[ | ]
NOTE: The player who constructs the bases will not be able to visit their own bases, unless a secondary save is used. This is primarily for use in multiplayer settings.
Following reports from the Alliance of Galactic Travellers and Amino Hub, it has been determined that a single player may construct multiple bases, which will all remain visible to everyone except the player who constructed them. This opens the option for a single player to create multiple resource farms, artistically-oriented bases, racetracks, or more.
There are two methods of utilizing this feature/exploit. Regardless of the method used, you should never visit a system where you built a base, except your current "active base." Doing so may cause the base to disappear until you load the save with the base as an "active base."
Back-up Save Method[ | ]
This is the preferable option, as it will allow you to reclaim your base if anyone else moves into the same system. If you use the other method, your base will be permanently lost if someone else overwrites it.
When the instructions say to "back up your save," this means you should save your save data file in a specific folder on your PC. If you are on PS4, you should back up your save to a USB and store it on your PC. PS+ Cloud Save will only allow for 1 save, and is therefore not a viable option. Always store your saves in folders that allow them to be identified, ie, a folder called "Origin Save" or "Glass Farm Base."
Turning base sharing off and on is probably unnecessary, but is a preventative measure to make sure your current active base doesn't experience any problems.
- (Optional) Create an "Origin Save" by gathering all/most of the resources you will need to create a new base.
- Back up your save. (If you want to keep the base you currently have, this is the save you will revert to for normal gameplay when you're finished constructing more bases.)
- Turn base sharing off. Optional: Manually deconstruct your current base to reclaim all resources.
- Claim a new base. Turn base sharing on.
- Construct the base as desired. Because you have a separate back up save, you can feel free to save automatically (ie exiting ship) or manually (ie at a Save Point or Beacon) in-game.
- Once you are completely finished with the base, back up your save.
- Load the save data for your "Origin Save." As your new base will have its own back up save now, you can feel free to overwrite it as your active save.
- Repeat.
With this method, if you need to return to a base you constructed in the past (to add or edit something, or to re-establish its presence if someone overwrote it), all you need to do is load the save data for that base.
Anyone who visits the newly-constructed base will still be able to see it, despite the fact that it is not your active base or active save.
Abandoned Base Method[ | ]
This method produces the same results as the Back-up Save Method, except you will not be able to return to edit your old bases. This method also requires abandonment of your current base.
- Claim a new base, and turn on Base Sharing (in that order).
- Construct the base as desired.
- Once you are completely finished with the base, back up your save.
- Turn off Base Sharing.
- (Optional) Manually break your base down to reclaim all resources used, for use in the next base.
- Repeat.
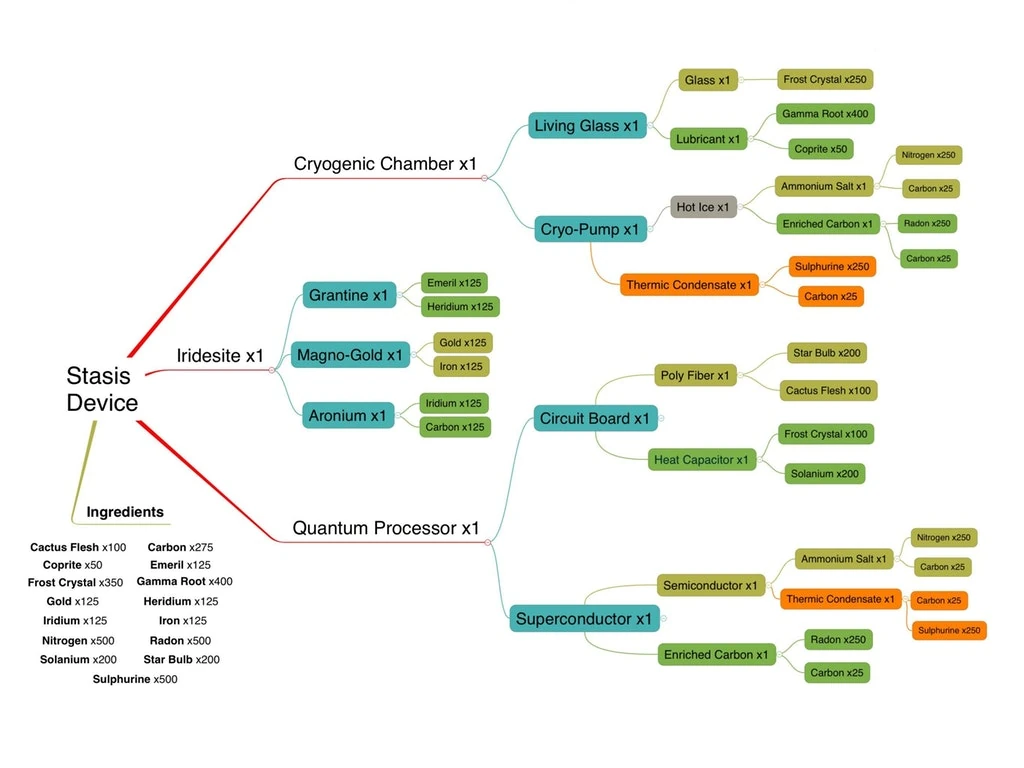
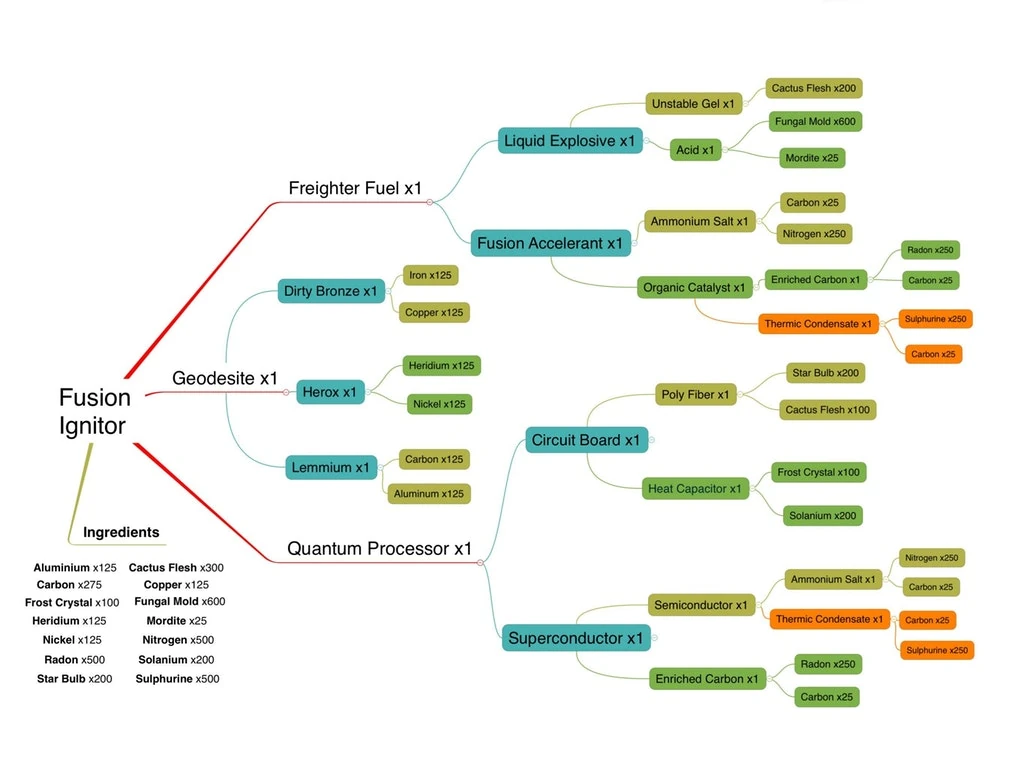
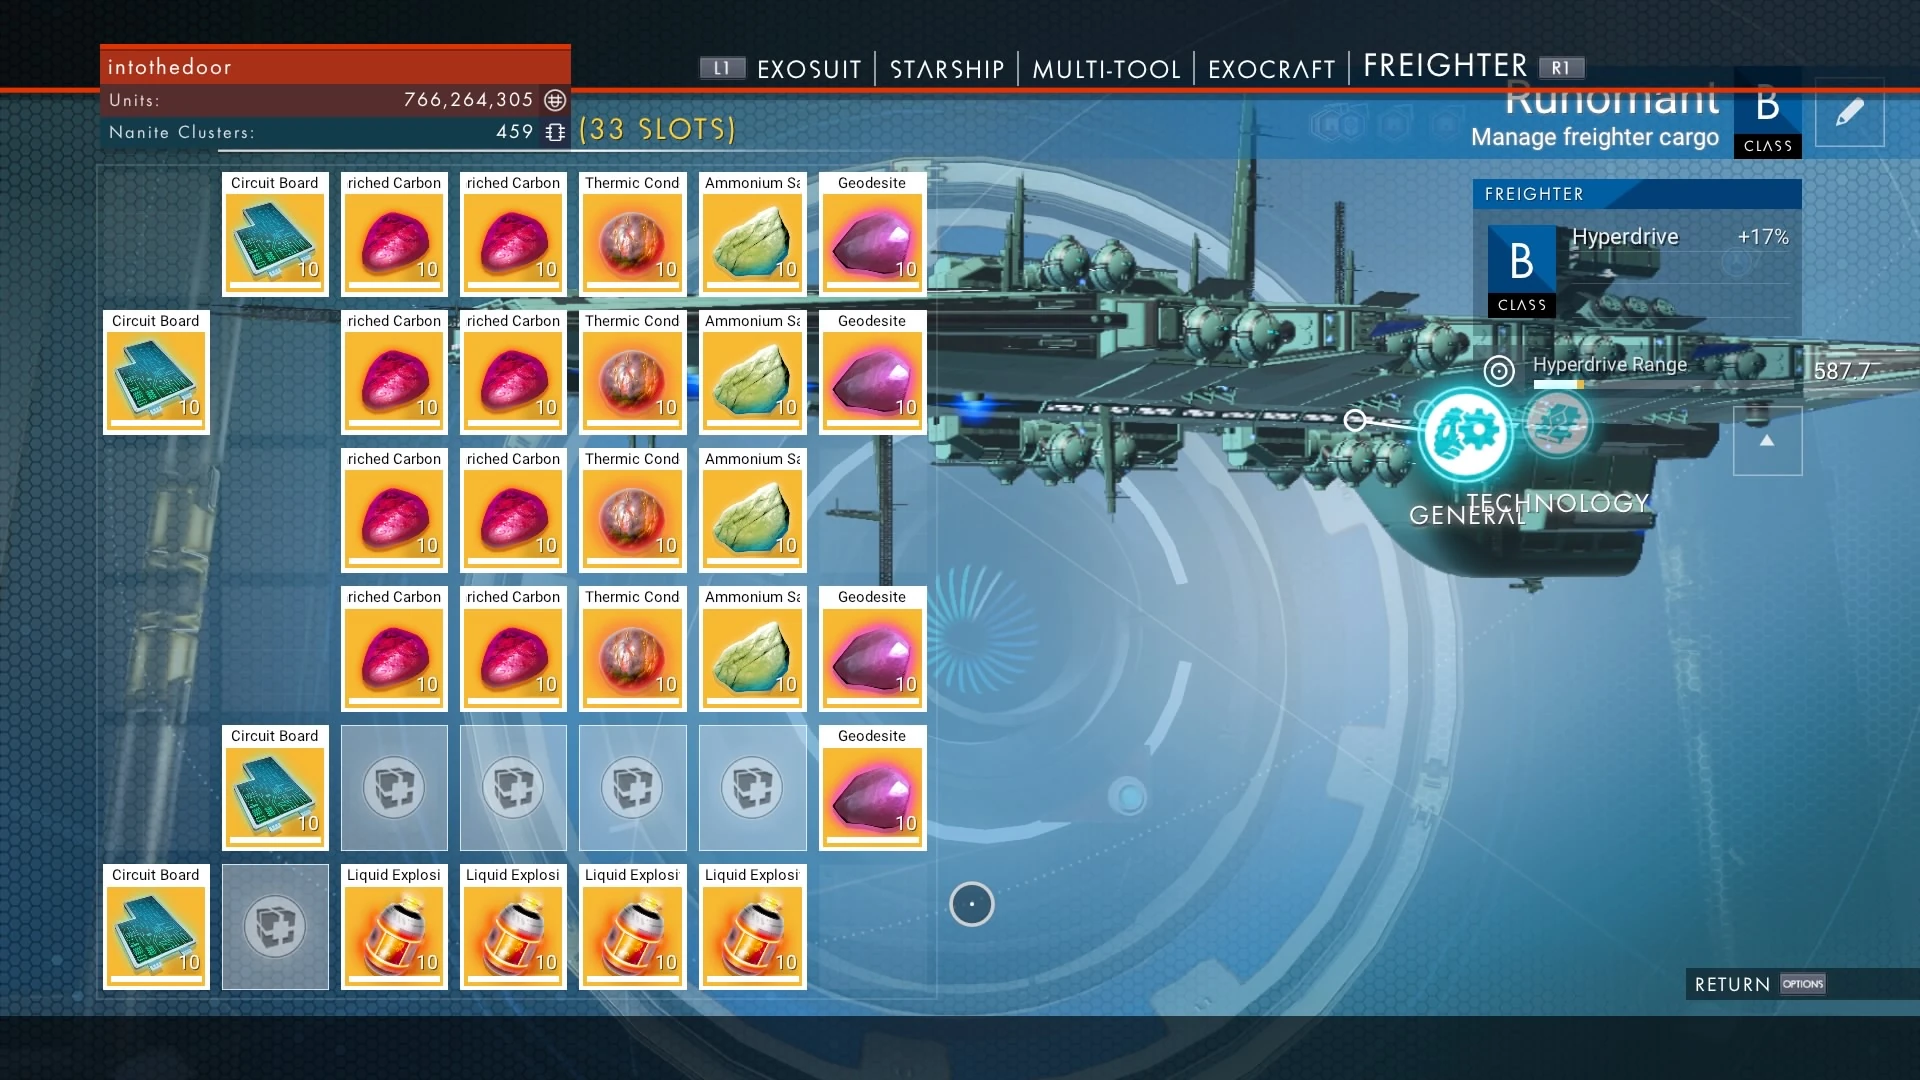
High End Crafting and the Beginnings of a Great Harvest Based Income[ | ]
Item Manufacturing Flowcharts
Stasis Device graphic by AngiBuddhist.
Fusion Ignitor graphic by AngiBuddhist.
Crafting high-end items like Stasis Devices and Fusion Ignitors can make large profits, but you need to set up the process so it doesn't consume up too much time. Once you are set up it comes pretty easy. The resources you need are everywhere, start out slow and build up your process. Keep it in perspective, if you create just 5 Stasis Devices or Fusion Ignitors, you can make some good money ![]() 90 million ($18mil x 5).
90 million ($18mil x 5).
- When starting out use your own farm to build the things you need. If available visit a Circuit Board Farm, Living Glass Farm, and Liquid Explosive Farm. These resources support your higher craft item one to one (ie. 5 Fusion Ignitors will need 5 Circuit Boards and 5 Liquid Explosives).


- Set up small stations for Harvesting gases, and find the right balance of effort versus reward; use the planet you are already on, and two others (or many many more) that are easy to get to. You will need three gas types (Refer to gas index below) and you always need twice as many gas products as the final crafted product. (ex. in crafting 5 Ignitors you would need 10 of each Gas-related item)
- We have tested and confirmed that you can place your own Atmosphere Harvesters on other Traveler's planets for convenience. As always, keep a safe distance from their base.
- Minerals are minimal effort... scan a planet and find the resource you need. Optimize the process by having a plan, use the places you are already at, and only mine what you need. The process is quick; I wouldn't worry about AMUs, however many use them and find them handy.
- Last but not least Carbon, you need more than you think. I suggest setting up several standing planters within your base for access.
Manufacturing and Operations[ | ]
Not having all these Blueprints is a pain; start kicking down doors as long as you need to until you obtain all of them. This will be time well spent; the reward will pay off.
Portal 'Method' to Harvesting[ | ]
With a Portal at your disposal, who is stopping you from knowing a couple planets addresses? Maybe these planets have the gasses or minerals that you need at your finger-tips? With the right knowledge (a little up front portal set-up work) a trip to an active portal can easily turn into a Harvest fest! Some travelers have been known to portal into systems for the sole purpose of getting the resources they need only to return home with containers full of their haul.
Gas Guide[ | ]
- General guide on Gases
Nitrogen = Lush or Fungal Planet (Star Bulb or Fungal Mould), Crafts Ammonium Salt
Sulphurine - Hot or Dry Planets (Cactus Flesh or Solanium), Crafts Thermic Condensate
Radon - Frozen or Radiated Planets (Frost Crystal or Gamma Root), Crafts Enriched Carbon
Tricks & Exploits[ | ]
Some players desire a shortcut to some aspects of the game, without being given everything (as in Creative Mode). If that describes you, this section is for you.
Drop Pod Farming[ | ]
If you still haven't fully upgraded your Exosuit slots there's an easier way to do it other than flying your ship lower than Han Solo while looking for one.
First and foremost you need a planet which bolsters a swarm of islands in a body of water, but which also has a considerable amount of buildings. When you find one, and after entering the atmosphere, search for a Trading Post with your ship's Economy Scanner. After landing install a Signal Booster and start searching for Drop Pods continuosly until the search locks on to the same Drop Pod on every subsequent try. Like this you'll be able to create a circle of Drop Pod locations around it - while having the Trade Post as an orientation landmark, visit them in sequence and sometimes get clusters of 3/4 per island, all in one planet. Relocate to another Trading Post and repeat until you have all exosuit upgrades.
Blueprint Farming[ | ]
If you want to avoid a lot of planet hoping to get all the blueprints you want from Operations Centre or Manufacturing Facilities there's an easy way to get them.
For this you'll need to find a Manufacturing Facility and an Operations Centre decently distanced between them, but on the same planet (2 minutes should be sufficient).
When you find them, place beacons to ease your navigation. When ready, solve the puzzle of Building A and head on to Building B and do the same. Head on over to Building A again and the building should have reset (sometimes the blast doors are rebuilt, sometimes only the alarm is back up again) and available to solve the next puzzle.
Note: if you find that you are getting the same puzzle over and over, get back on your ship and fly away from the building for ~5 seconds and come back. The puzzle should have changed. If in an operations centre the blast door must have been blown away.
This has been tested in version 1.38, on PS4 normal mode.
Use this document to answer all questions needed. Refer to this video to see it working in a almost identical way.T
Civilized Space[ | ]
- Civilization-based gameplay